
Who doesn't love the combination of chocolate and pistachio? For me, it's a match made in heaven, just like this creamy pistachio tart.
I was originally inspired to make it after seeing one of Martha Stewart's milk chocolate pistachio tart.
I knew I had to make a vegan version!
Jump to:
🔪 Recipe Overview
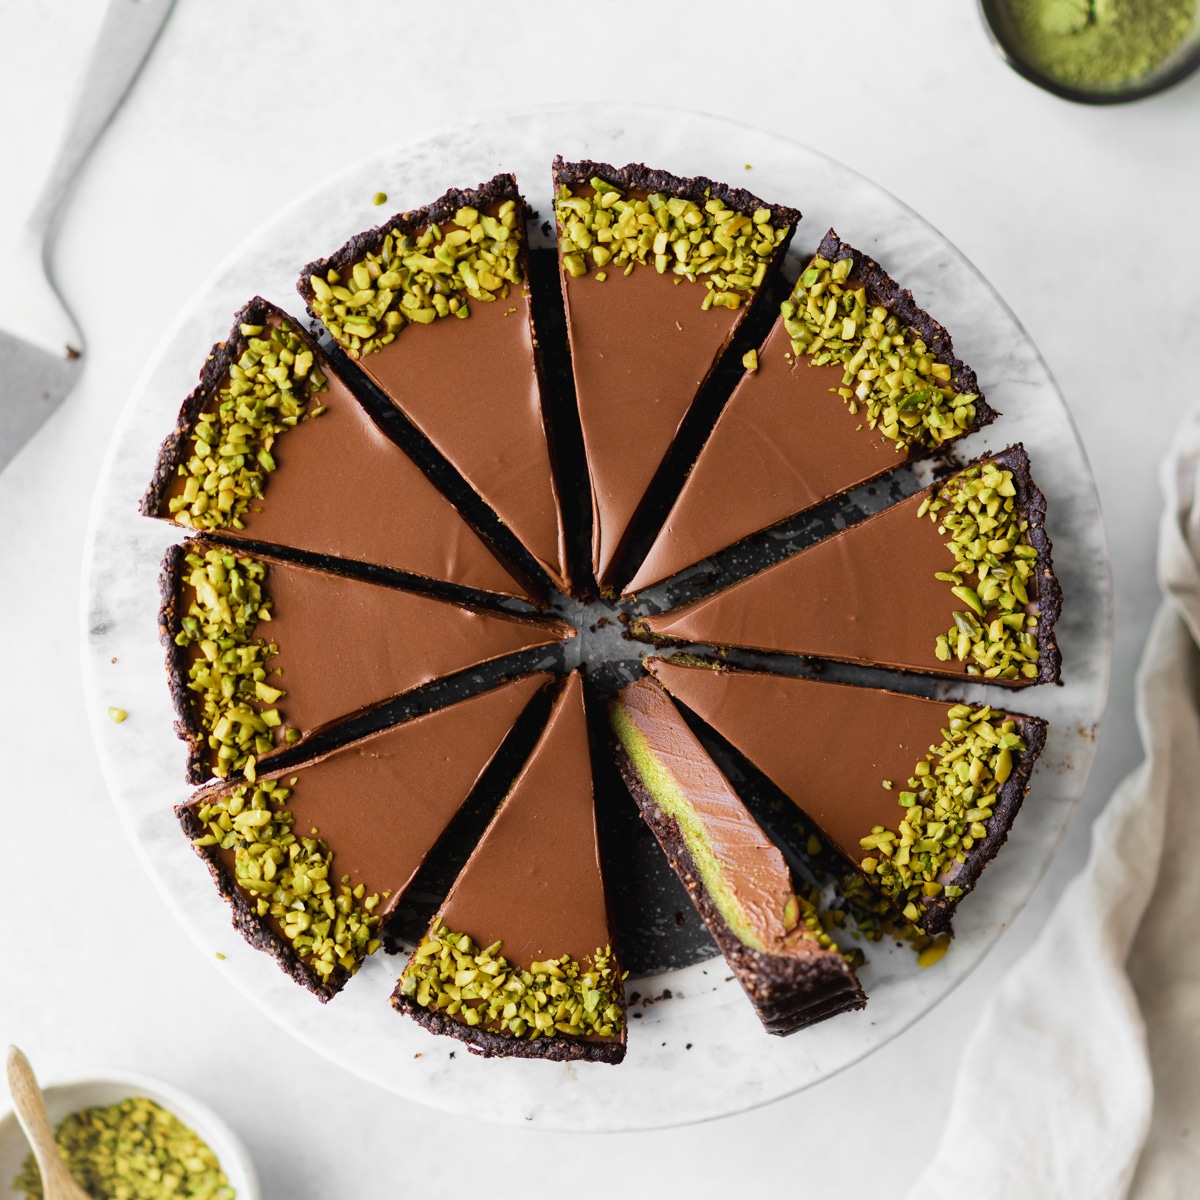
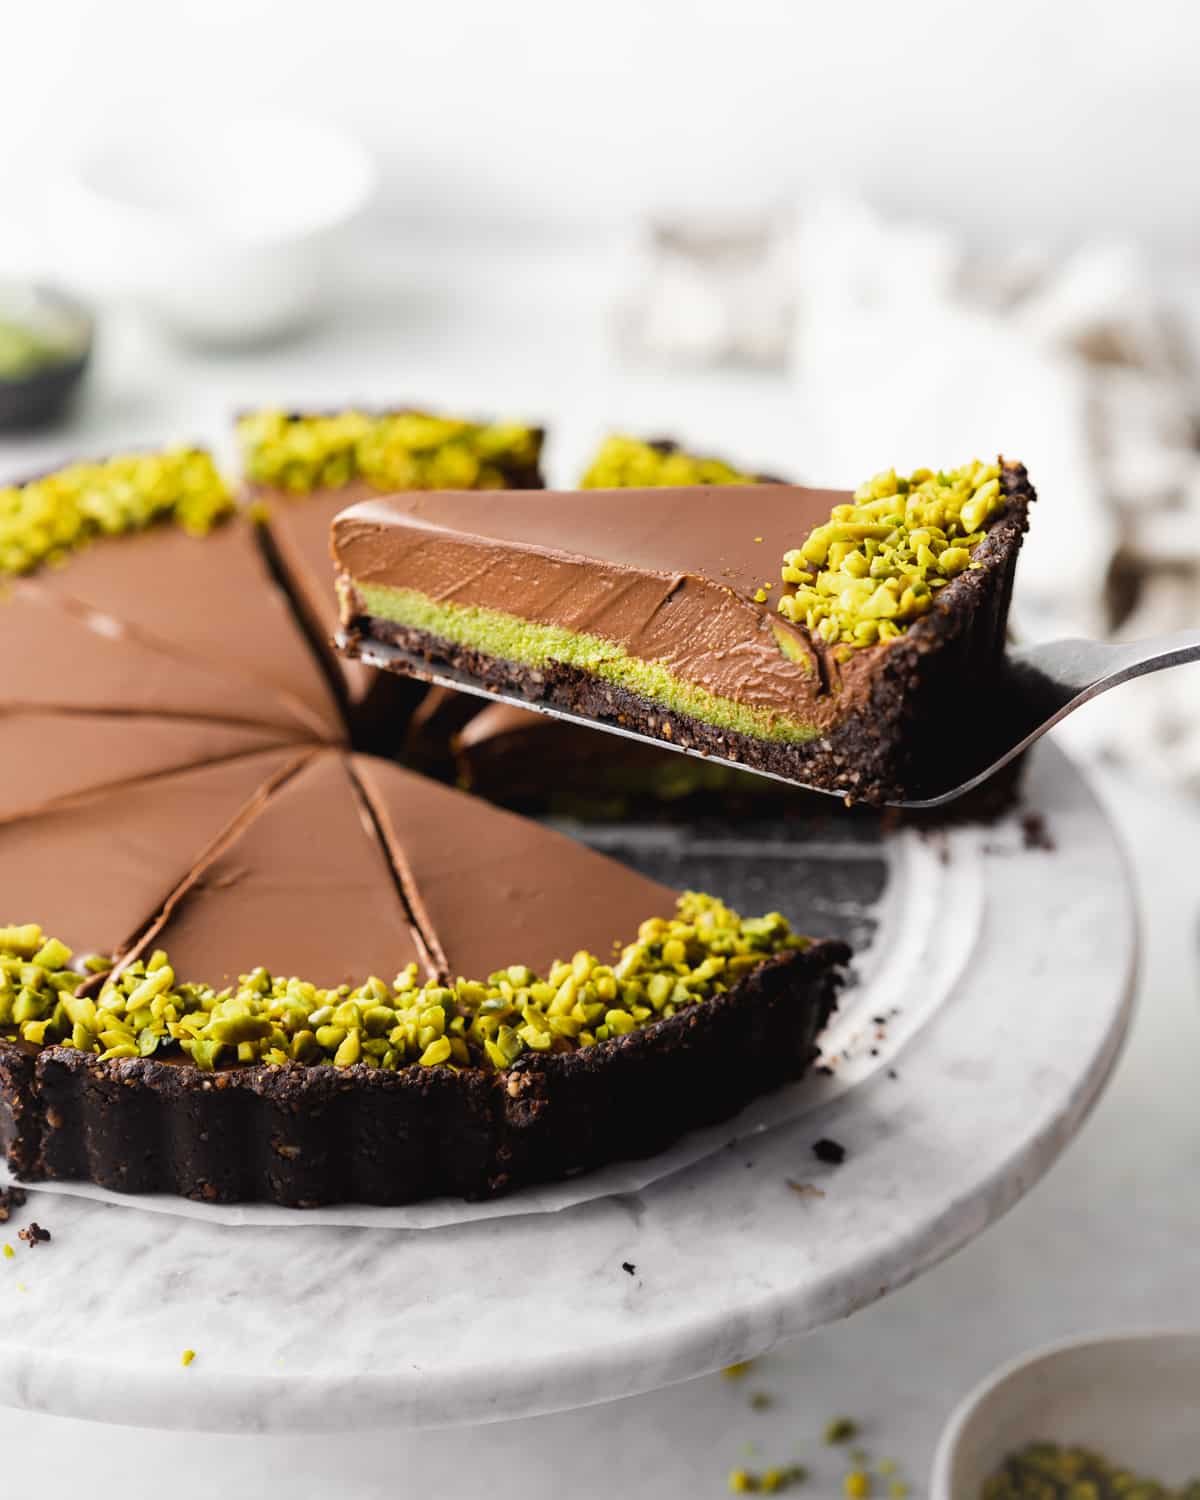
Taste: Rich dark chocolate and fragrant sweet pistachio and a nutty crust.
Texture: Creamy, smooth chocolate ganache filling with a raw brownie consistency no-bake base.
Level of Ease: Super easy to make. You just need a little bit of patience to make the pistachio paste and crust. But one of the best things is it can be made in advance so you don't need to worry about running around the kitchen on the day of your gathering or celebration.
Best Served: It's a popular holiday dessert with readers during Christmas and Thanksgiving.
Free-From: Eggless, dairy-free, and gluten-free. it's also made using wholefoods (mostly!).
Aubrey says: "I love this recipe! The pistachio chocolate combination is just sweet enough to be delicious but not over the top. I will definitely be making this again." ★★★★★
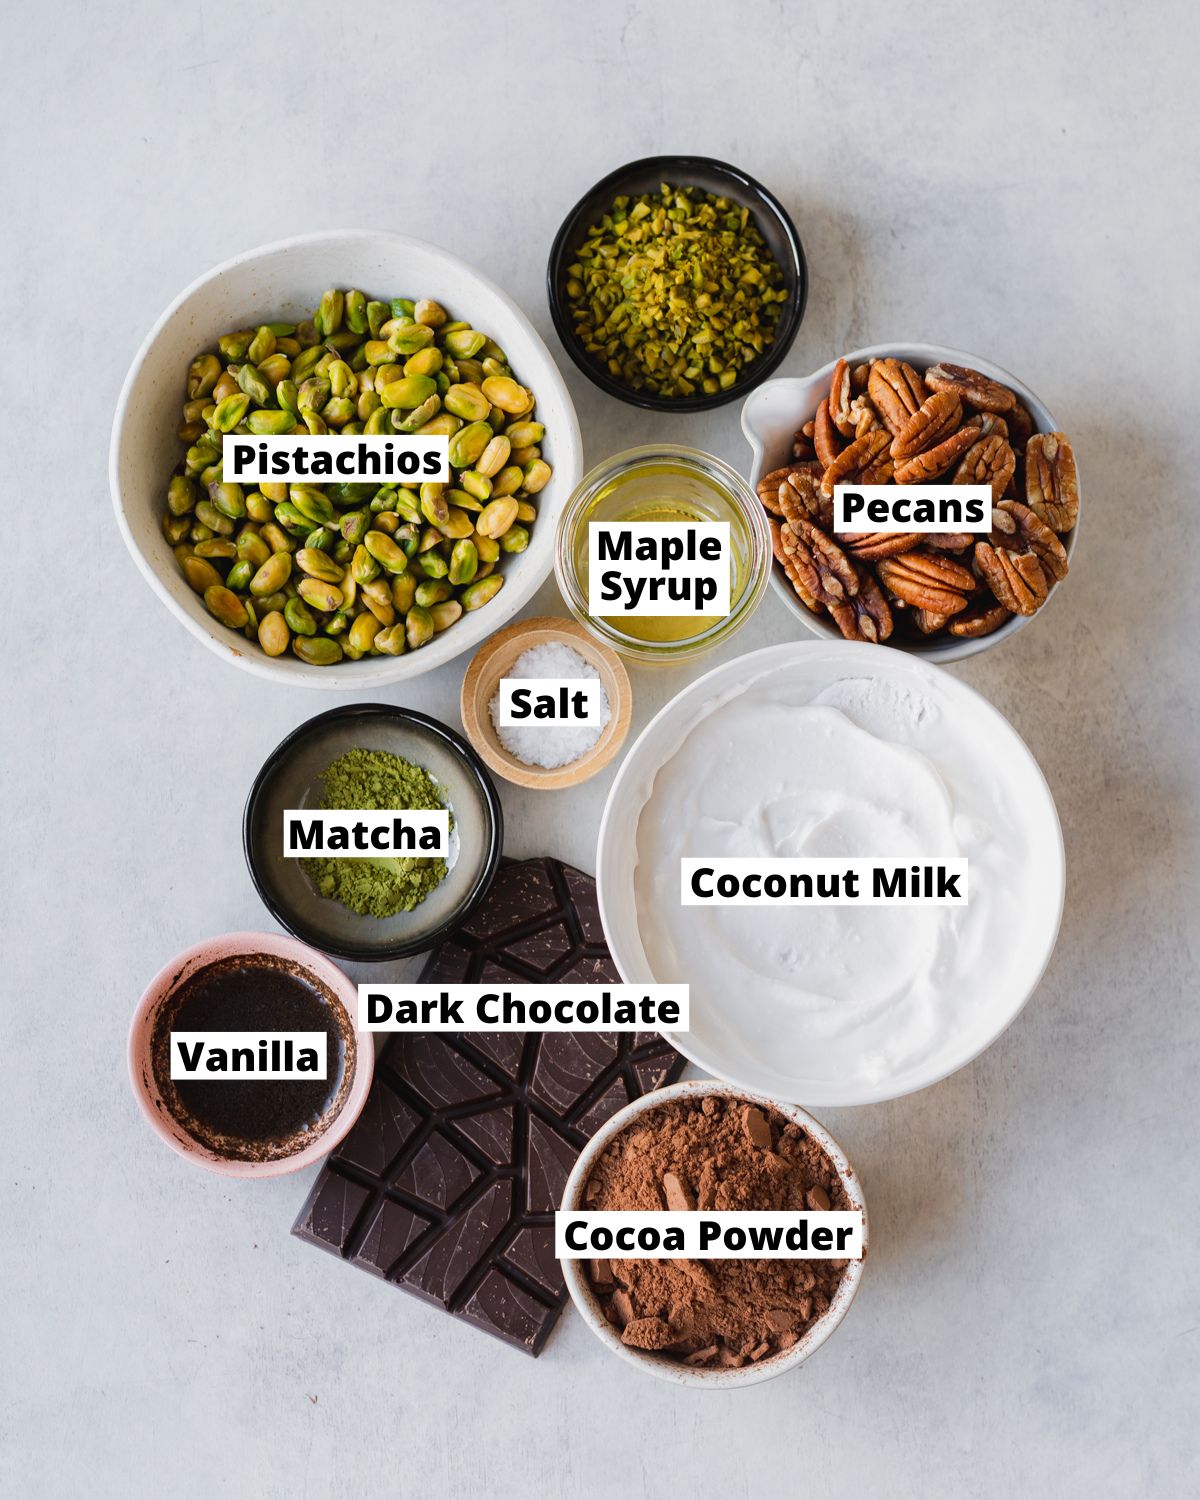
🧾 Ingredients Needed
Here's everything you need to make this no-bake chocolate tart recipe from scratch:
If you're nuts about pistachios make sure you check out my white chocolate pistachio tart, no-bake pistachio cheesecake, pistachio tiramisu, pistachio donuts, and pistachio ice cream too!
Ingredient Notes
There are under 10 ingredients in this chocolate pistachio tart (7 ingredients if you leave out the optional ones!)
- Pistachios. Either raw pistachios or roasted unsalted pistachios work great here. Both will give a slightly different color and flavor to the pistachio paste.
- Dark chocolate. Use good quality vegan dark chocolate with a minimum of 70% cocoa content.
- Full-fat coconut milk. The filling is made with full-fat coconut milk from a can. You can use straight-up coconut cream instead, either way, we're only using the thick cream and not the watery part from the end of the can.
- Pure maple syrup. This is the natural sweetener used for each element of the tart. You can also use agave syrup.
- Matcha powder. This is completely optional, but it adds a beautiful pop of vibrant green color to homemade pistachio paste, especially if you're using roasted pistachios.
- Pecans. The crust for this tart is no-bake and made using wholesome ingredients, including pecans. These can easily be interchanged for other nuts. Almonds, walnuts, or cashews will all work here too.
- Vanilla bean paste. This is optional, but adds another layer of flavor and really brings out the sweet nutty flavor of the pistachios in the paste.
Get Your Free E-Book!
Sign up to the Addicted to Dates newsletter for your FREE Guide To Vegan Cheesecakes!
🥣 How To Make No-Bake Chocolate Tart
Find the complete list of ingredients, quantities, and instructions in the recipe card at the end of this post.
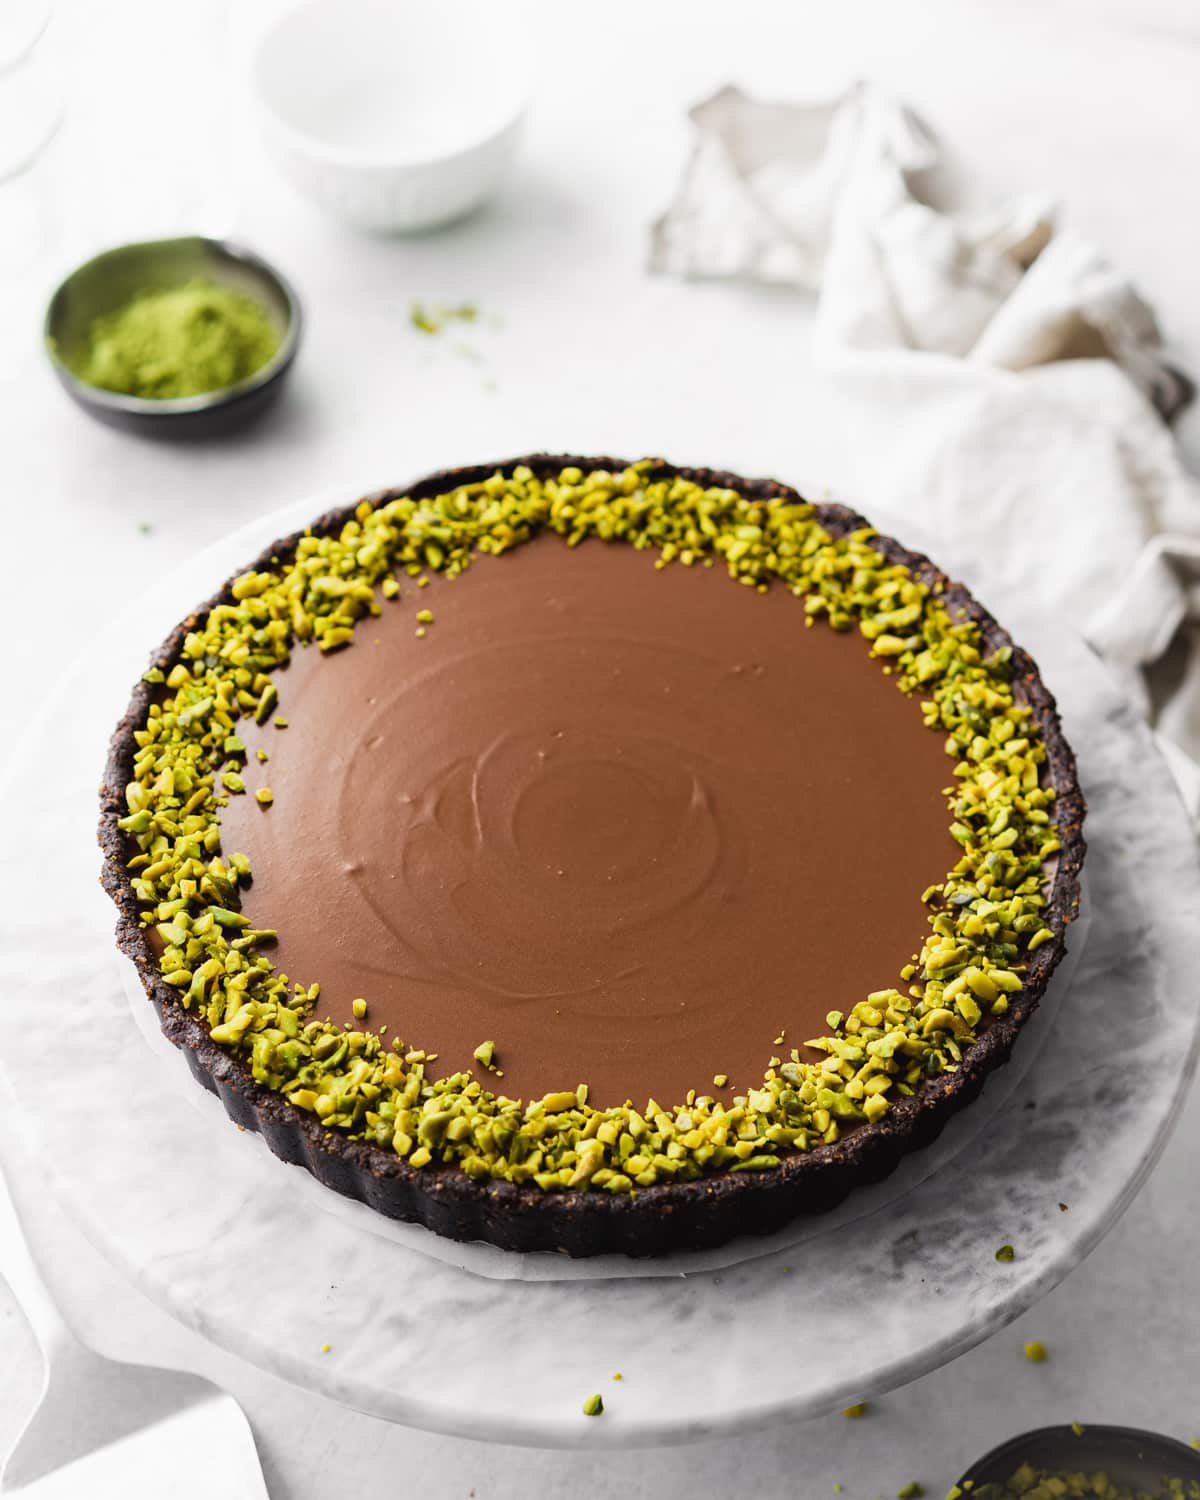
This easy chocolate tart comes together in 3 simple stages; no-bake brownie base, pistachio paste, and chocolate ganache filling.
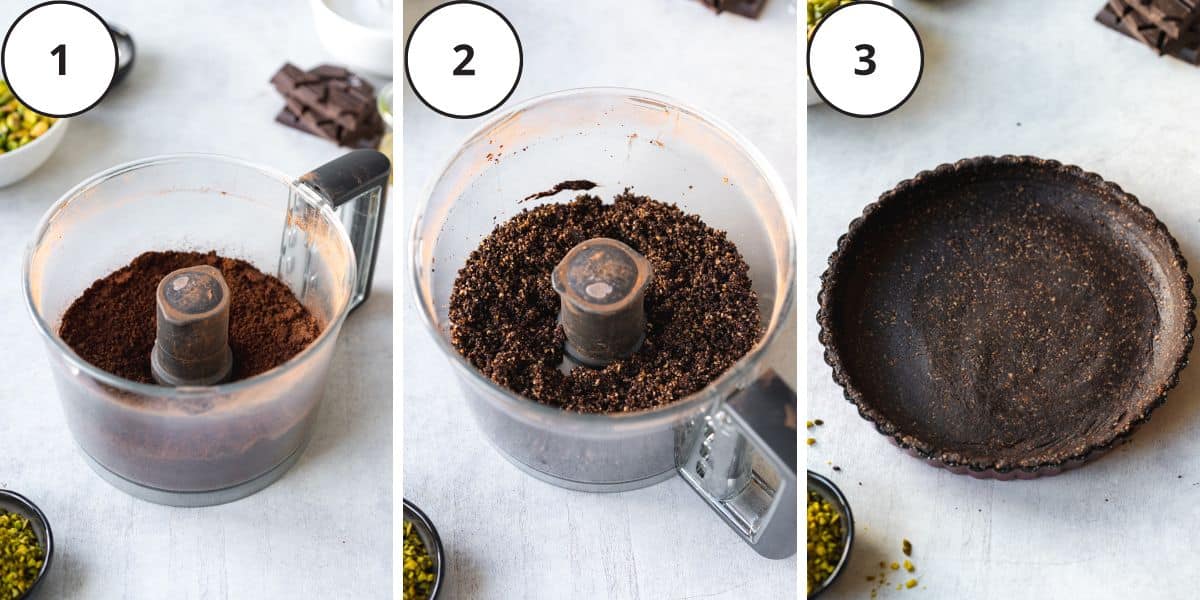
- Blitz the pecans, sea salt, and cocoa powder in a food processor until they have the consistency of rough sand.
- Add the maple syrup and blend again until combined (the mixture should stick together when pressed between your fingers).
- Press the crust into the base of a tart tin, using your fingers first and then a spoon to smooth and compact it down firmly.
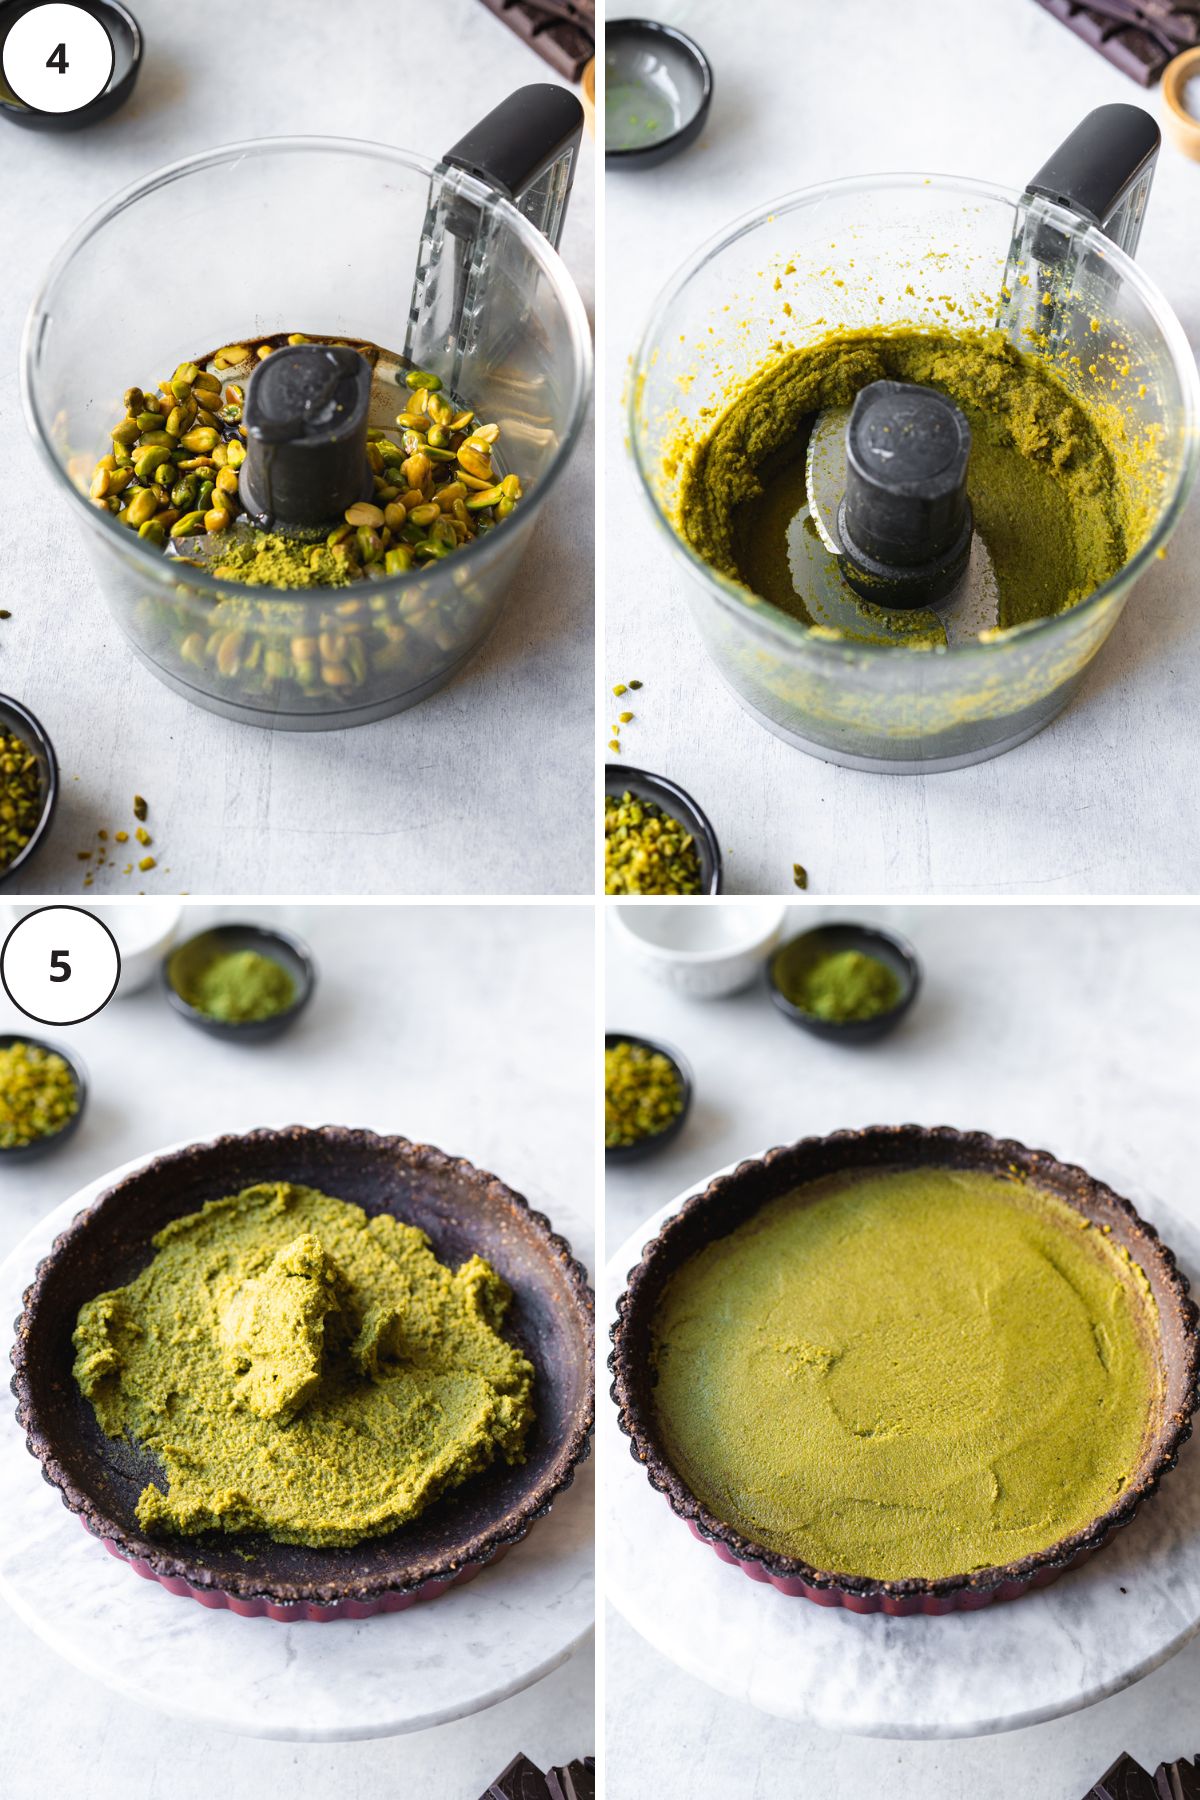
The pistachio paste can be processed in a high-speed blender or food processor:
- Process the soaked pistachios, maple syrup, matcha, and vanilla until smooth.
- Smooth the pistachio paste on top of the crust, using an offset spatula to spread it in an even layer.
📝 Recipe Tips
If your no-bake crust isn't sticking between your fingers, add a little more sweetener or a dash of water and blend it again.
Make sure the crust is firm before adding the pistachio paste to ensure you get nice clean layers.
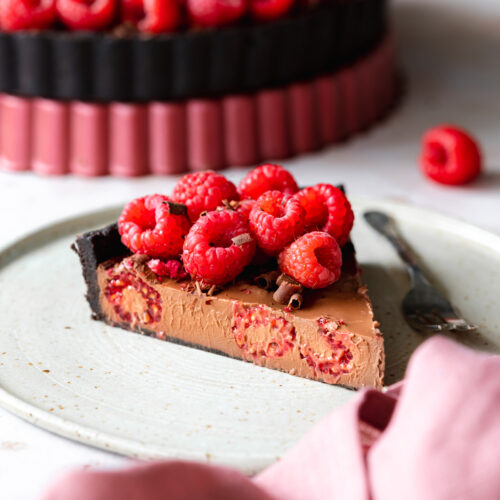
If you want to skip the nuts in the crust, you can swap the base for a cookie crust like the one in this raspberry chocolate tart.
Make this no-bake tart ahead either the day/night before you plan on serving it to ensure it sets up nicely and to save time.
Roasted pistachios are generally more affordable than raw pistachios, in case you want to save a few bob, both work beautifully!
Remove the skins from the pistachios! Pistachio skins are usually brown in color and they can mess with the appearance of your pistachio paste.
💬 FAQs
Yes absolutely. This tart freezes really well. Simply wrap any leftover chocolate tart in plastic wrap or place it into an airtight container.
Freeze for up to 3 months, and defrost in the fridge the night before serving.
It will keep in the fridge in a sealed container, or on a plate covered with plastic wrap for up to 5 days.
Yes, you can use Pistachio cream (crema al pistacchio) just make sure it does not contain any added dairy or honey.
Pistachio butter is also fine to use, but it usually has a runner consistency so be prepared for the filling to ooze out when you slice into the tart!
🍫 More Chocolate Tart Recipes

Love this recipe? Please leave a 5-star ★★★★★ rating in the recipe card below and consider leaving a comment as well, thanks!
Stay in touch with me through social media @ Instagram, Pinterest, TikTok, and Facebook. And subscribe via email to get all our new recipes!
📖 Recipe
No-Bake Chocolate Tart with Pistachio Paste
Equipment
- 9" tart tin with removable base
Ingredients
Crust
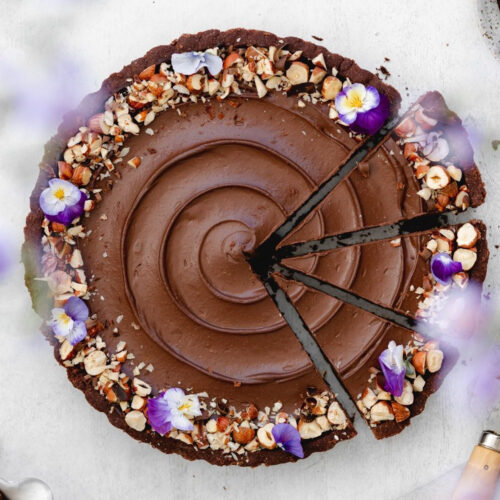
- 200 g (2 cups) pecans or hazelnuts, walnuts, or cashews
- 70 g (⅘ cup) cacao powder raw cacao or unsweetened cocoa powder
- ½ teaspoon sea salt
- 50 ml (⅕ cups) pure maple syrup or agave syrup, plus 1-2 tbsp more if needed
Pistachio paste
- 150 g (1 ¼ cups) shelled pistachios raw or roasted and unsalted, *see note 1
- 50 ml (⅕ cup) pure maple syrup or agave syrup
- 2 teaspoons vanilla bean paste or vanilla extract
- 1 teaspoon matcha powder optional, for color
Chocolate ganache
- 350 g (1 ½ cups) chilled full-fat canned coconut milk* or coconut cream *see notes (use only the cream from top of the cans - roughly 2x 400ml cans)
- 170 g (6 oz) vegan dark chocolate finely chopped
- 60 g (⅕ cup) pure maple syrup or agave syrup
- ¼ teaspoon (1 g) sea salt
- 50 g (⅓ cup) chopped pistachios for garnish
Instructions
- Prepare: Soak the shelled pistachios in a bowl of water for 4 hours, or quick-soak them in boiled water for 30 minutes to an hour). Rinse the pistachios with clean water and remove as much of the skins as possible using your fingers. They should come off easily if soaked properly.Line the base of a 9" tart tin with a piece of parchment paper and set aside.
- Make the base: Add the walnuts, cacao powder, and salt to a food processor and blitz until they form a fine crumb consistency. Add the maple syrup and blend again to combine. The mixture should stick between your fingers like dough. If the mixture doesn't stick, add a little more maple syrup or water (1 tablespoon at a time) and blend again until it does.Press the dough into the bottom and sides of the tart tin using your fingers first, and then use a spoon or spatula to compact it down really well. Place in the freezer for 30 minutes until firm.
- Make the pistachio paste: Place the peeled soaked pistachios, maple syrup, vanilla, and matcha in a high-speed blender or food processor and blitz for 5-10 minutes until really smooth. Scrape down the sides of the jug every minute or so in between blends. Check that the tart base is solid. Then spread the pistachio paste on top of the crust using an offset spatula to smooth it out in an even layer. Place in the fridge while you make the ganache.
- Make the ganache: Add the coconut milk to a saucepan and heat up to a simmer, but do not boil.Add the finely chopped chocolate to a heat-resistant bowl and pour the heated coconut milk over it. Allow it to sit uncovered for 5 minutes, then stir until smooth. If the chocolate hasn't melted through, place the bowl on a double boiler to heat it through. Whisk in the maple syrup and salt. Pour the ganache into the tart shell. Gently tap the tart on the counter to knock out any air bubbles and smooth out the top with a spatula if needed. Chill for a minimum of 4 hours, or overnight.
- Garnish the tart: Carefully remove the tart from the tin and place it on a serving plate. Sprinkle chopped pistachios around the outer edges.
- Storage: Refrigerate in a sealed container, or on a plate covered with plastic wrap for up to 5 days.Freeze for up to 3 months, and defrost in the fridge the night before serving.
Notes
- Chilled coconut milk: Refrigerate the cans of coconut milk overnight, then only use the thick cream from the top of the cans. You will need 2x 400ml cans for this recipe.
- You can use Pistachio cream (crema al pistachio) instead of homemade paste, just make sure it does not contain any added dairy or honey.
- Pistachio butter is also fine to use, but it usually has a runner consistency so be prepared for the filling to ooze out.
- Make sure the crust is firm before adding the pistachio paste to ensure you get nice clean layers.
© addictedtodates.com. All content and images are protected by copyright. If you want to share this recipe, please do so using the share buttons provided. Do not screenshot or republish the recipe or content in full. Instead, include a link to this post for the recipe. Thank you!
*This recipe was originally published in December 2018. The recipe has since been improved and updated to minimize the ingredients used and simplify the instructions.
The torte is tasty, but super labor intensive. Pistachios nuts were soaked 4 hours & rinsed with fresh water. It took over an hour to peal the pistachios. For this reason, I will not be making this recipe again.
Hi MB,
Ahh I hear you — peeling pistachios is no joke, it’s definitely the most time-consuming part of that recipe.
Appreciate you giving it a go and sharing your feedback!
Yummy tart although the ganache didn’t set well. I ended up freezing it.
I made this and didn’t set well. I used 1 can full fat coconut milk (1 1/2 cup). But I read it again and there are more descriptions about 2 cans of coconut milk and just use the cream only. It is kind of confusing. So basically what is needed is 1 1/2 cups coconut cream? Why not just say 1 1/2 cups coconut cream in the recipe?
I ended up freezing it.
Hi Debbie,
Thanks for your feedback! There’s actually a note on that ingredient in the recipe card explaining what to do - the recipe calls for 1½ cups of the thick coconut cream that separates from canned coconut milk. That’s why the instructions mention using two cans, since the amount of cream you get from each can can vary.
If the full can (including the liquid) is used instead, the ganache won’t set as firmly, which sounds like what may have happened here. I’m glad it was still tasty though!
Great tart. The pistachio layer wasn’t coming together in the high speed blender so after 10 min I gave up and used the cuisinart. My coconut milk didn’t separate overnight and when I poured it over the chocolate it was a separated mess. I then mixed cocoa powder with maple and it was a perfect pourable ganache. It all came together well in the end. Thank you!
First, my ganache didn't thicken enough. I researched ganache and found that, for a thick pie base ganache, the ratio of chocolate to cream should be 2:1. This recipe has it the complete opposite. After adding another 6 oz. of chocolate, my ganache set up perfectly. Also, this recipe made enough of the three components that it would fill a 10" tart pan. I had enough of the three components left over to make a small personal tart. I haven't yet cut and served the tart as a whole, but each component tasted really good.
So good! I used walnuts in the crust. I was a bit nervous using so much cocoa powder in the crust but WOW🤤. Thanks for the recipe.
Been baking with recipes from Pinterest since it started and this is the first time leaving a review because of how impressed I was with how it turned out. HIGHLY recommend if anyone is in the fence about trying the recipe. Went with pistachios (definitely worth soaking) and pecan in the crust. So good!
It was delicious! I couldn't get my ganache to set. I don't know what I did wrong. I think one of the cans of coconut milk was too thin (I used two different brands after realizing I needed more than one ಠ︵ಠ). Let me know what I can change. It stayed in the fridge for 9 hours and 2 hours in the freezer.
Hi Kim,
I’m so glad you enjoyed it, even if the ganache didn’t quite set! It definitely sounds like the thinner can of coconut milk may have caused the issue. Next time, I’d stick with full-fat coconut milk from the same brand for consistency, and you can also add a bit more chocolate to help it firm up. Out of curiosity, what percentage chocolate did you use? That can sometimes make a difference too.
My coconut cream did not separate. It is an organic brand and I’ve used before so I’m not sure what happened, whomp whomp.
I have heavy whip on hand, and don’t necessarily need this dessert to be vegan, so I’m just wondering if heavy whip (liquid whipping cream meant for whipping into whip cream) will work the same for consistency and texture.
Hi Nicole,
I’m sorry to hear your coconut cream didn’t separate — that can be so frustrating! I don’t use heavy cream myself, so I can’t say how it would turn out in this recipe. You could increase the amount of chocolate a bit to help the filling set more firmly.
I just wanted to update that I did end up using regular heavy cream to make the ganache as I didn’t necessarily need this recipe to be vegan.
It ended up being the best dessert I think I have ever made. It was for a dinner with friends and everyone was in absolute awe of the flavours and texture combinations.
I usually make a cheesecake for Christmas dessert, but this year I am going to make this and am already so excited for it.
Hi Nicole,
That makes me so happy to hear, thank you for the update! I love that the heavy-cream version worked so beautifully for you, and it sounds like you absolutely nailed it.
If I wanted to recreate this with store bought pistachio cream, how many grams of pre-made cream do I need?
Hi Haley,
You should be good with around 200g!
Everyboby liked it!
Yay! That’s the best kind of feedback. Thank you 🙂
Looks umy!
So good
Thanks so much for your feedback, Rima!
It was a lot of work, but it turned out beautifully (taste and presentation). I will probably add a bit more maple syrup next time as it wasn't that sweet, but it was very yummy!
So happy you loved the recipe, Rachel! And you could definitely add more maple to suit your taste next time. Many thanks for your comment 🙂
I made this for my birthday and it was amazing. Both my parents thought it was restaurant quality! Will absolutely make again.
Hi Alex,
That's so lovely to hear! Thank you for trying the recipe, and for your feedback 🙂
What can I sun for coconut milk?
Hi Amrutha,
If you're able to get a dairy-free double cream suitable for whipping that should work!
I've just made this and it's divine!
Just wondering what to top it with to lighten up the richness. I tried a tangerine sorbet, but the cold kept the ganache from melting on your tongue and it dampened the flavour. Maybe mashed raspberry coulis? Any ideas? Thank you!
Hi Laura,
That tangerine sorbet sounds delicious! You could try add a touch of tangerine or orange zest to some vegan Greek-style yogurt or vegan sour cream and topping it with that instead
Had to make do so mixed pecans with cashew in the crust.Didn't make enough of the pistachio paste (maybe has to do with pistachio size or measurement applied to shelled as opposed to unshelled?) Anyway that layer still turned out pretty tasty, marzipanish almost. Also mixed in cranberries as topping-garnish and the tangy-ness really complemented the sweetness.Thanks so much for sharing!!
Hi Eileen,
I love that you added cranberries and improvised the crust. Did you measure the nuts with a scale?
Hi! Just wondering if I can chill the tart in the freezer rather than the fridge if I’m short on time? I’m not sure I have 4hrs for fridge chilling time.
Hi Melinda,
You probably could, I would guess it would still need 2-3 hours in the freezer
Hi dear Christina,
Once again amazing recipe with beautiful Pistachio Paste!
#CRUST
Can I use Pistachios (raw shelled or unshelled?) Instead of Pecans?
And can I remove Cacao powder if I use this Crust Base for your Classic Pistachio Tart?
Maybe can use Almond fine flour to make like a soft cake Crust?
#PISTACHIO PASTE
I have Pistachio extract flavor, like Almond extract you use for the Classic Pistachio Tart..
Do you think I can use it instead of Almond extract (whereas I love it) or I can use the 2 together and in which quantity?
they go pretty well together or overcharged?
Please let me know...
Many many thanks
Henri 🙂
Hi Henri,
You should be able to use pistachios in the crust instead of pecans. I do not recommend making it without the cocoa powder as that will throw out the other ingredients - you would need to experiment a little with this!
I haven't used pistachio extract but I think it would be lovely. Just start by adding a small amount and taste it to see what you think before adding it to the tart. You can always add more, but not less 🙂
Hi! I'm looking for making this tart for my BF's birthday and I was wondering if I could make the crust from Oreos. it will be less healthy of course but I'm wondering about the flavours. I'd love to hear your thoughts about it. thank you!
Hello,
That sounds lovely, you definitely could swap the crust. Just make sure you pop it in the freezer to firm up before adding the pistachio layer so that its strong enough 🙂
I made this for my coworker at her request for something chocolatey and pistachio-y. 12/10 best thing I've made. Everyone loved it-- I'm not the hugest pistachio fan and I loved it! Someone just told me they have been dreaming about it every day since!
Hi Marissa,
Oh that's so wonderful! Thank you so much for letting me know, I'm so happy you all loved the recipe x
Question please! I'd like to make this (the lazy way). If I just buy a can coconut cream rather than collecting it from on top of the coconut milk, how many mLs or gm of coconut cream would I need for the recipe?
Yes absolutely! You'll need the same amount, 350 g
I used about 3 and a quarter cans of coconut cream. I used a digital scale to measure the volume needed.
Se ve deliciosa y en especial visualmente atractiva, en algún momento la prepararé.
Gracias por tu receta.
You're very welcome, I hope you enjoy it!
Hey Christina!
You use same Tart Tin as for Snickers Tart?
2,4cm height?
This Crust can be used for Chocolate Hazelnut Tart I guess?
This turned out very well although the ganache has a slightly grainy texture from the coconut cream.
My only concern with making it again is the high content of saturated fat in coconut milk/cream….almost as much as butter, which defeats the purpose of I using a vegan recipe.
It would be great if you could find a healthy substitute for coconut milk/cream.
Thanks.
Hi Suzanne,
I'm glad you enjoyed the recipe! It sounds like the coconut milk may have been overheated, as the ganache should be silky smooth.
In terms of coconut milk, vegan doesn't necessarily mean healthy. I create vegan recipes here in order to reduce harm to animals, and my goal is to make them as tasty as people remember their non-vegan counterparts being so that they can still enjoy all the tasty desserts.
But if you have personal concerns about coconut milk you could try another plant-based cream in its place, such as oat or soy which I think should work but they will be slightly less rich.
I hope this helps!
Raw or roasted and/ or salted pistachios ?
Hi Hania,
Raw or roasted are both fine to use, roasted will give a toasty deeper flavor, and raw will give a brighter green color. Just make sure they are unsalted.
Hello, Christina!
This looks amazing, I have to try it. I just want to ask you if the nuts for the crust are raw or roasted? And if they need soaking too? I have already made one of your recipes- the creamy pistachio tart and turned out absolutely delicious 😋
Thanks for sharing such incredible recipes!
Hi Viktoriya,
Thank you so much, I'm delighted that you loved the creamy pistachio tart. I usually use raw pistachios, but I have also used unsalted roasted pistachios are they are delicious. It's completely up to you! The pistachios need to be soaked (as detailed in the recipe). As for the crust, the nuts do not need to be soaked and you can use either raw or roasted.
I hope this helps!
Yes, that helps a lot. I will be trying to make it for a friend’s birthday, so really excited 😊
Are coconut milk and coconut cream the same product? And does the thick part of the cream from the 2 cans actually total 480 grams? I see that you give the weight of the amount to use in the recipe, but just need to clarify before delving into this lovely tart…
Hi Melissa,
Yes, you can use coconut cream in place of coconut milk in this recipe. The 480g is of the thick coconut cream from the top of the cans only. The number of cans needed will depend on the brand you're using. I normally use Biona or Natures Charm, which yield that weight from 2 cans, but other brands may require a third can.
Hope this helps!
Thank you Christina,
It is a wonderful tart. I made it 2/3 vegan with my short pastry crust, because that is just our favourite, but worth the time and taste for sure! It could have been a bit sweeter, but other then that, it was a big hit and I will most definitely make it again! Beautiful slices are in the freezer. Safer that way😊 Thanks for sharing!
All the best,
Melissa
Hi Melissa,
Thank you so much for your feedback, I'm delighted that you loved the recipe x
Hi there!
Can I use coconut cream in place of the chilled coconut milk? The textures are fairly similar but I’d like to do this precisely!
Thanks!
Hayley
Hi Hayley,
Yes, coconut cream will give a similar result to using the thick part from the top of full-fat coconut milk. Hope this helps!
How much coconut cream do you use? I'm interested in weight specifically, as I have made my own coconut cream from two solid blocks of pure creamed coconut, and there's A LOT! Thanks.
Hi Nanna,
I've just added the gram amount to the recipe, It's 480g. That's amazing that you've made your own coconut cream by the way!
Dear Christina,
do you think substituting the maple for dates could work the same?
Hi Joana,
For the pistachio paste you could try dates but it may be difficult to get the mixture to blend, you'd likely need to add some plant milk or water to get it moving. For the filling you could simply omit the maple syrup, as some sweetness will come naturally from the chocolate. I hope this helps!
Made this dish for a dinner party. Everyone LOVED it. It does get melty fairly quickly so make sure to put it back in the fridge after serving.
So happy you all loved it Isabelle! Thanks so much for sharing your feedback
Could I substitute almonds for hazelnuts?
Hi Morgan,
Yes you can swap the hazelnuts out for almonds
This looks absolutely amazing. Gotta try it out!
Excellent 😊
This tart was a huge hit at our holiday meal. My tart pan is 12 inches, so I doubled the recipe to make sure there was plenty. I had a package of pistachio paste, and it's smoother/thinner than your homemade. I added some coconut cream and the other ingredients you list. I would use less matcha next time, but everyone loved it. It's rich, delicious, and makes a beautiful presentation. I posted pictures of it and got many requests for the recipe. Thanks!!
Hi Michelle,
That sounds absolutely amazing, I would love to see the pictures of them! And yes the matcha is for colour mostly, so it can be omitted entirely if you're not a fan. Thanks so much for the amazing feedback x
Thanks - result SO delicious Ive shared this recipe twice already in one week! I didn't have enough pistachios for the decoration so used flaked almonds. Also I only used one can of rich and creamy coconut milk as well over half of it was solid when I took it out of the fridge - and only a 90 g bar of vegan chocolate. Even so there was enough ganache to cover the whole tart.
Hi Bridget,
Thank you so much for your wonderful feedback! Great to hear that the recipe still came together with those amendments and almonds on top sound amazing!
hi christina, if we use this Pistachio Paste in a regular pie, will the paste be melted while being baked inside the pie? thanks 🙂
Hi,
I haven't tried baking the paste so I can't vouch for how it will behave I'm afraid. I imagine it would work if you're blending it in with other ingredients though.
okay christina that’s okay, thank youu for the reply, such a unique recipe btw 😉
You're very welcome, and thank you so much! Would love to hear how it goes if you give it a try 🙂
Hi I've just tried to make this tart but it turned out a disaster and I don't know why, could you please help me? I followed the recipe, but when I had to add the layer of pistachio butter on the crust it didn't stick, the butter and the crust got mixed up and I could hardly make another base. I am glad I managed to make it but I wonder what went wrong.
I believe that this tart tastes amazing, and I can't wait to eat it tomorrow! Thank you for this great recipe!
Hi Anna,
Thank you so much for your feedback 🙂 I wonder if perhaps the consistency had something to do with it. If the base is too soft or sticky and/or the pistachio paste isn't blended down enough it could be an issue. A way to avoid this next time would be to pop the base into the freezer for an hour before adding the paste, that way it will definitely be solid enough to take on the next layer. I hope this helps!
Christina x
Hi Christina,
thank you so much for getting back to me.
The tart was a success, even if the taste of the pistachio paste wasn't there unfortunately, but it was delicious anyway!
When I made the pistachio paste it was completely smooth but too thick, so I added 3 tbsp of water and it turned out perfect.
The base wasn't sticky at all, it was a bit dry too. Next time I'll follow your advice, the base has to be sticky and I'll leave it in the freezer for an hour.
Thank you for your advice and for sharing this fantastic recipe.
I love this recipe! The pistachio chocolate combination is just sweet enough to be delicious but not over the top. I will definitely be making this again.
Hi Aubrey,
That's so great to hear! I'm delighted that you enjoyed the recipe, thanks so much for the lovely feedback x