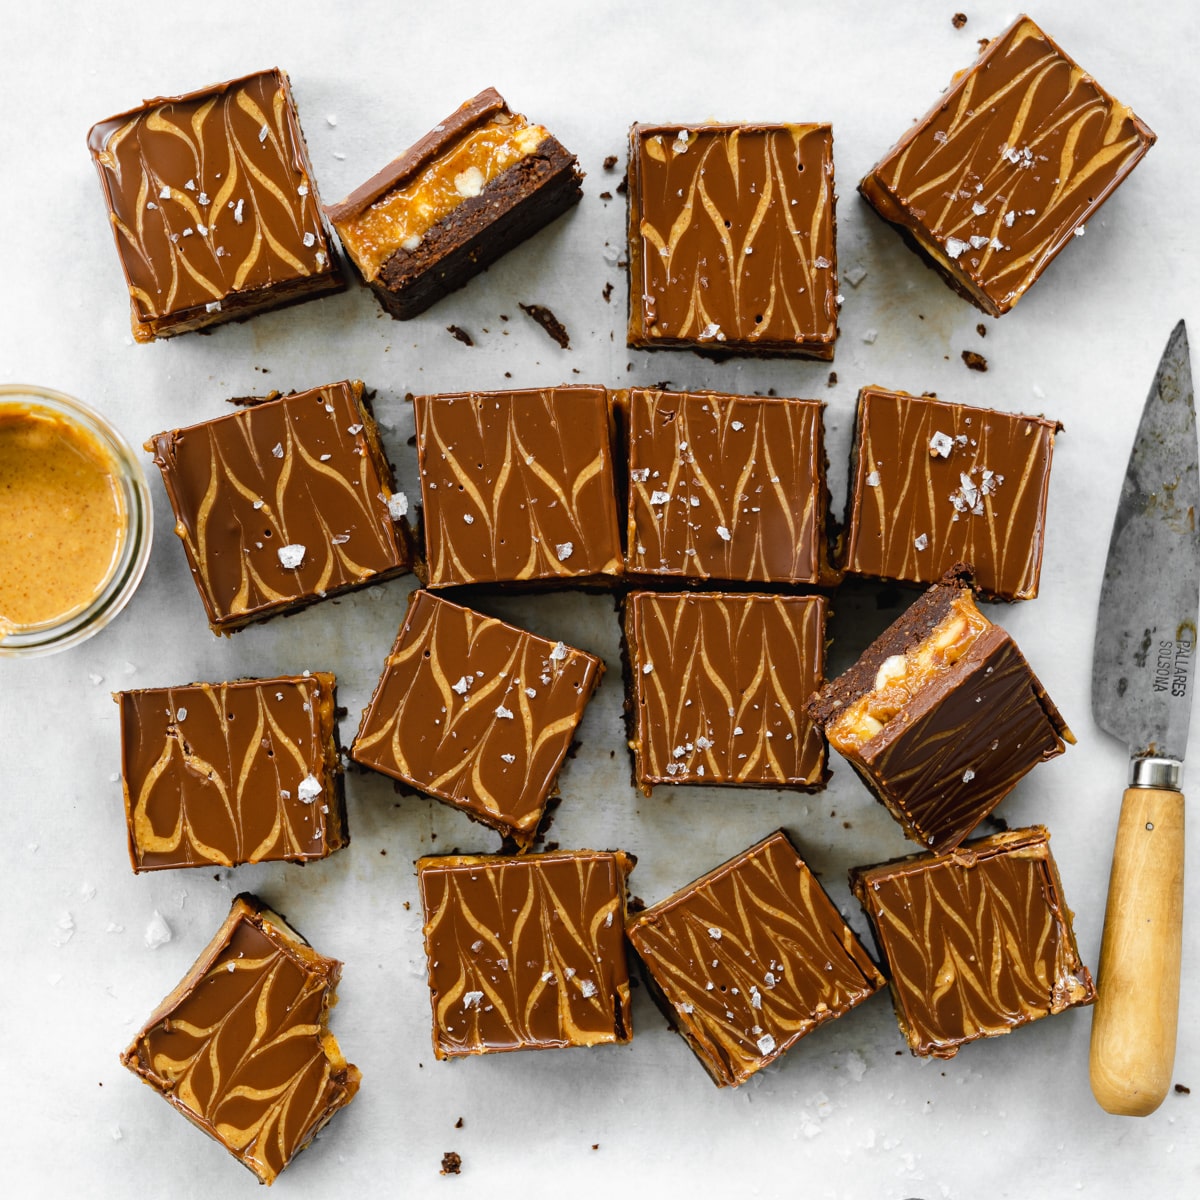
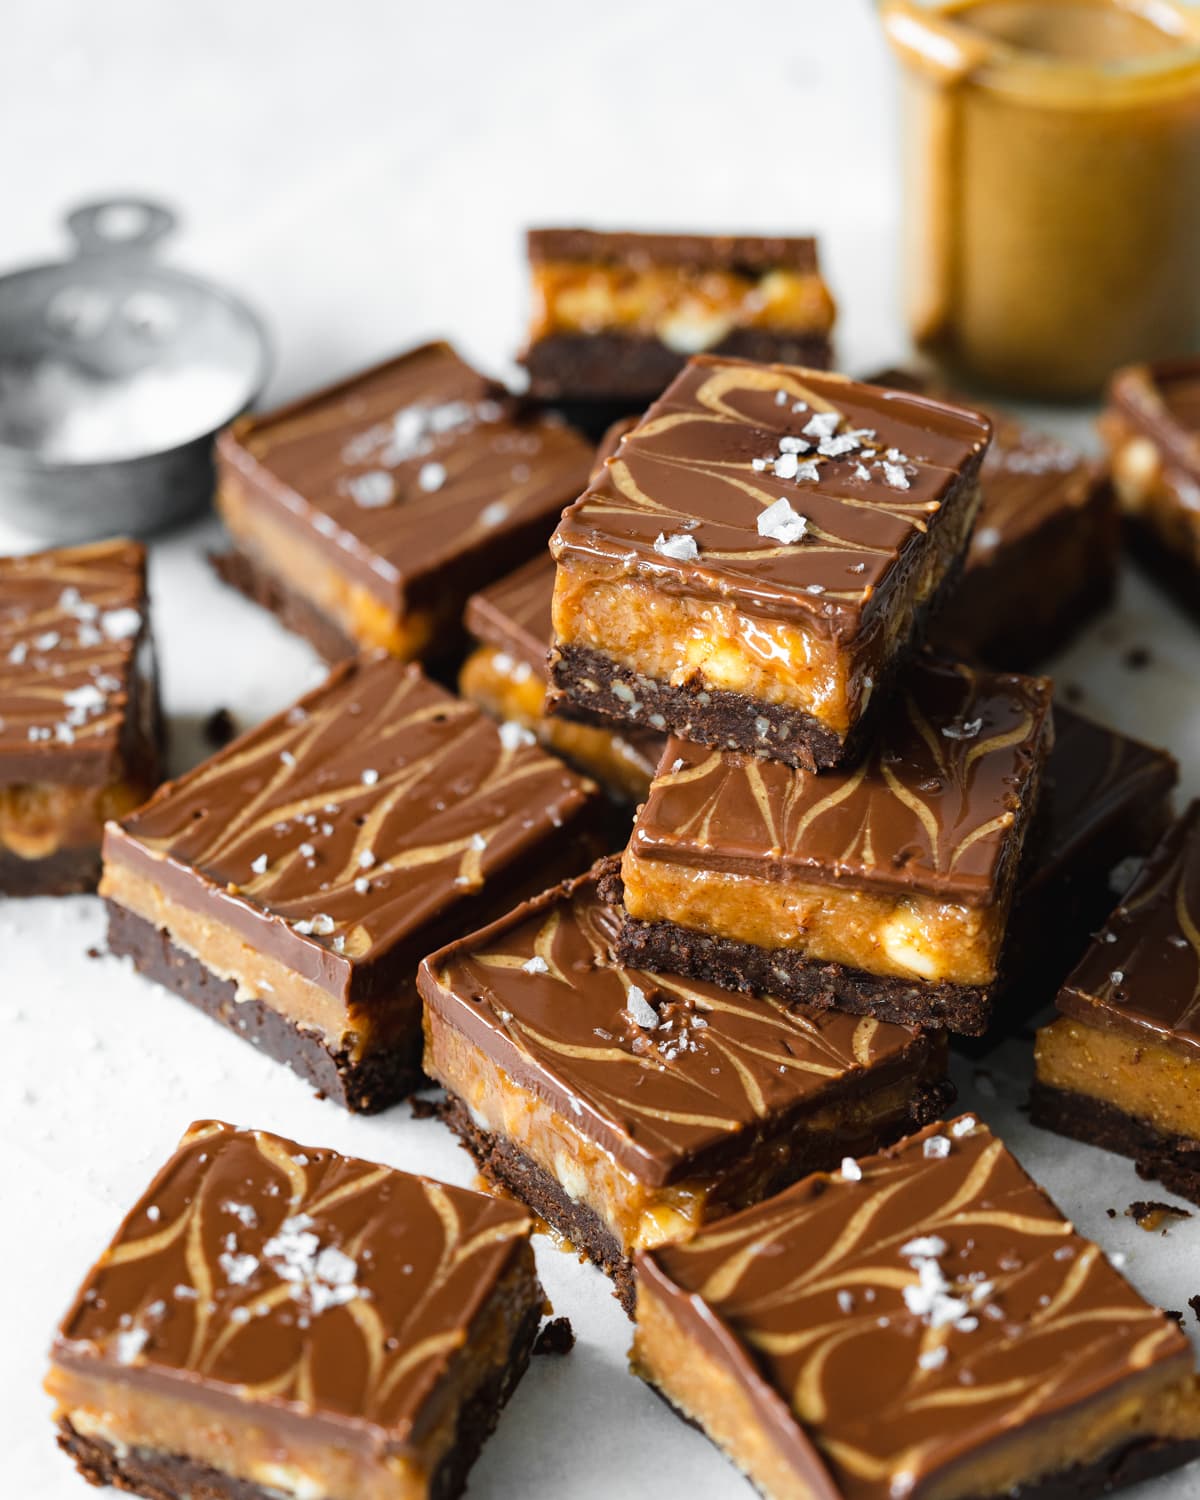
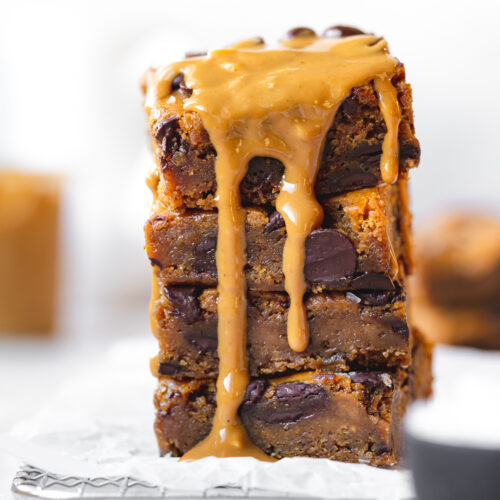
These vegan peanut butter brownies are a must for chocolate and peanut butter lovers. You won't even need to turn on your oven, which makes them pretty fail-proof. No baking skills are required here!
They're basically a hybrid between my vegan snickers and vegan caramel brownies.
📖 Recipe Overview
- Easy to make and requires no baking.
- Made with 10 ingredients or less.
- Can be adapted as refined sugar-free.
- Gluten-free, eggless, and dairy-free.
- Made using wholesome plant-based ingredients like dates and nuts
- Decadent and delicious.
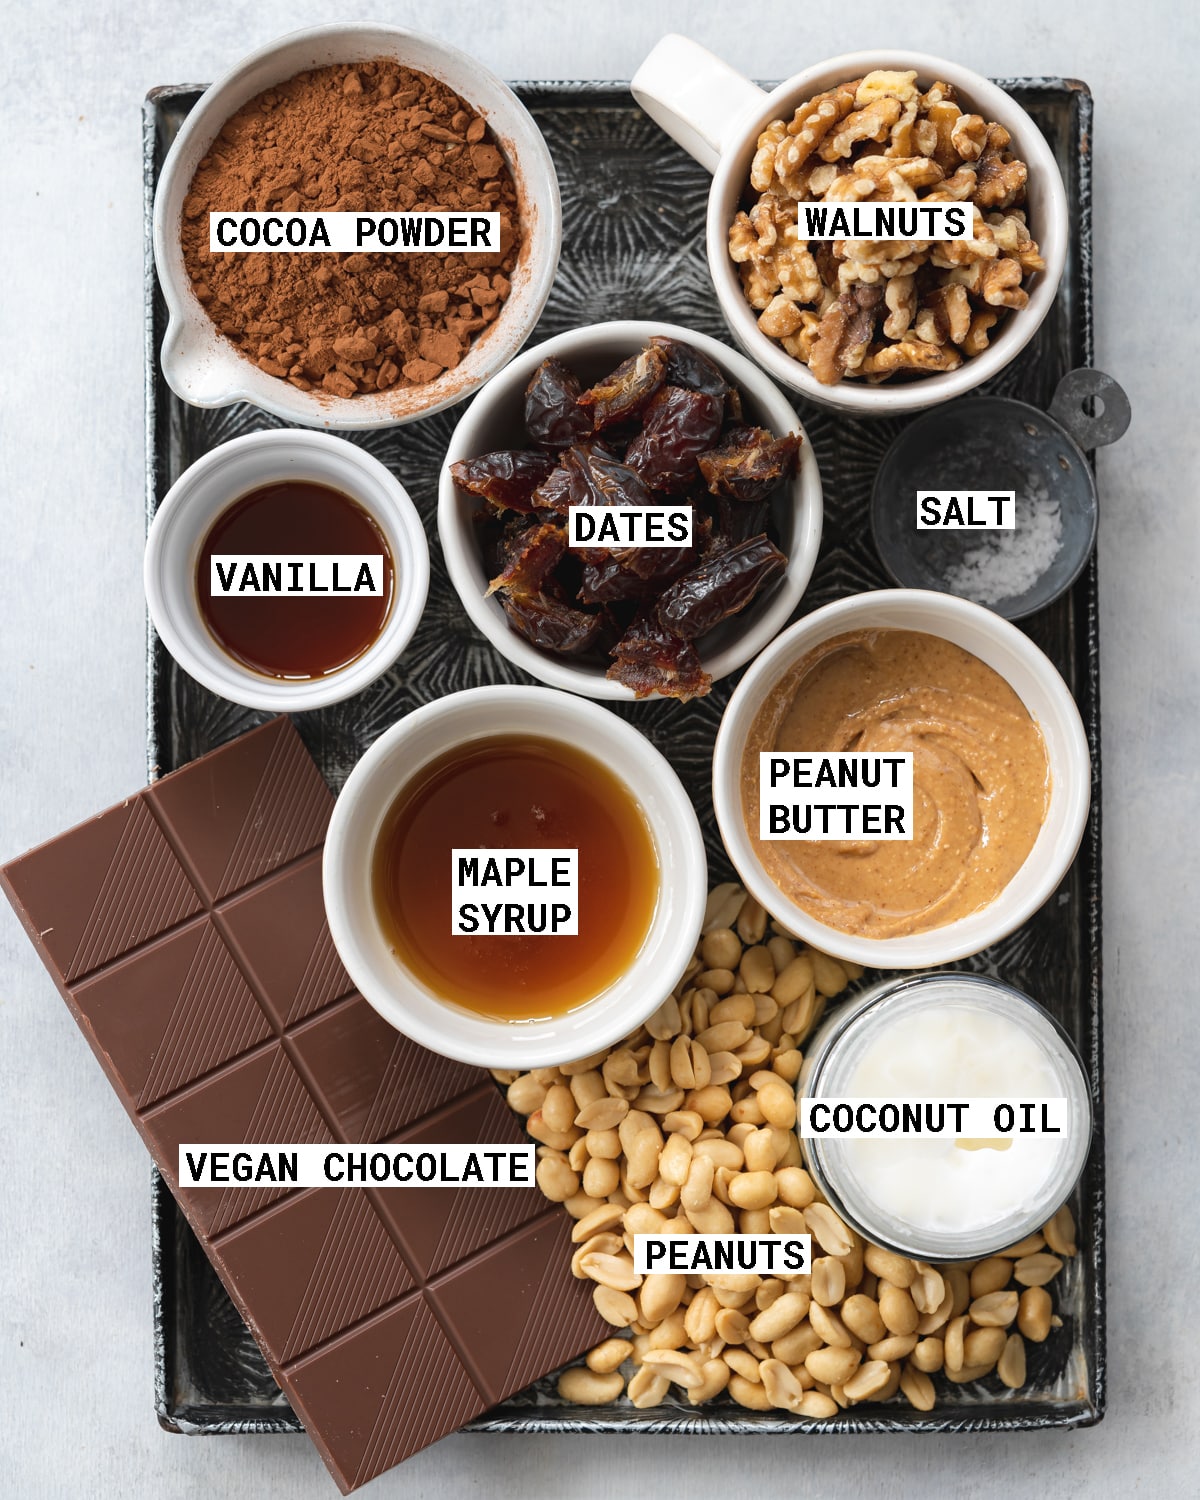
🧾 Ingredients Needed
As promised, you just need a few wholesome ingredients to make these delicious peanut butter brownies. Here's what to grab:
If you prefer baked brownies, check out these biscoff brownies, fudgy brownies, and gluten-free brownies!
Ingredient Notes
- Cocao powder or raw cacao powder, depending on what you have to hand. You can also use Dutch-processed cocoa powder for a deeper chocolate flavor that's slightly less bitter than regular cocoa. Make sure you go for unsweetened cocoa powder and not hot chocolate mix which often contains dairy.
- Walnuts form the base of these no-bake brownies. You can swap them out for other nuts like pecans as well.
- Dates are the ingredient that binds together the ingredients of the brownies as well as helps provide them with sweetness. I recommend Medjool dates if you can get them, as they are naturally soft and juicy. If your dates are on the dryer side, you may need to soak them in some hot water first to help soften them up a little.
- Smooth peanut butter is added to every layer of these vegan brownies. It's important to use creamy peanut butter, not a crunchy type. I know these are chocolate peanut butter brownies, but if you have a peanut allergy you can always swap out the peanut butter with another nut butter or seed butter. Some possible swaps include almond butter, sunflower seed butter, or tahini.
- Roasted peanuts are added to the peanut butter caramel layer to create a sort of snickers filling! As these are usually ready-salted, again you can use raw peanuts if you're trying to cut back the salt content. Also, feel free to swap them out for chopped cashews to make these brownies peanut-free.
- Pure maple syrup together with peanut butter forms the easy peanut butter caramel layer of the brownies.
- Coconut oil is solid at room temperature, and is an important ingredient as it helps the peanut butter layer to stay set rather than oozing out everywhere when you try to slice the brownies!
- Any vegan chocolate of your choice will work for this recipe, whether you prefer dark chocolate or vegan milk chocolate is up to you.
🥣 How To Make No-Bake Peanut Butter Brownies
Find the complete list of ingredients, quantities, and instructions in the recipe card at the end of this post.
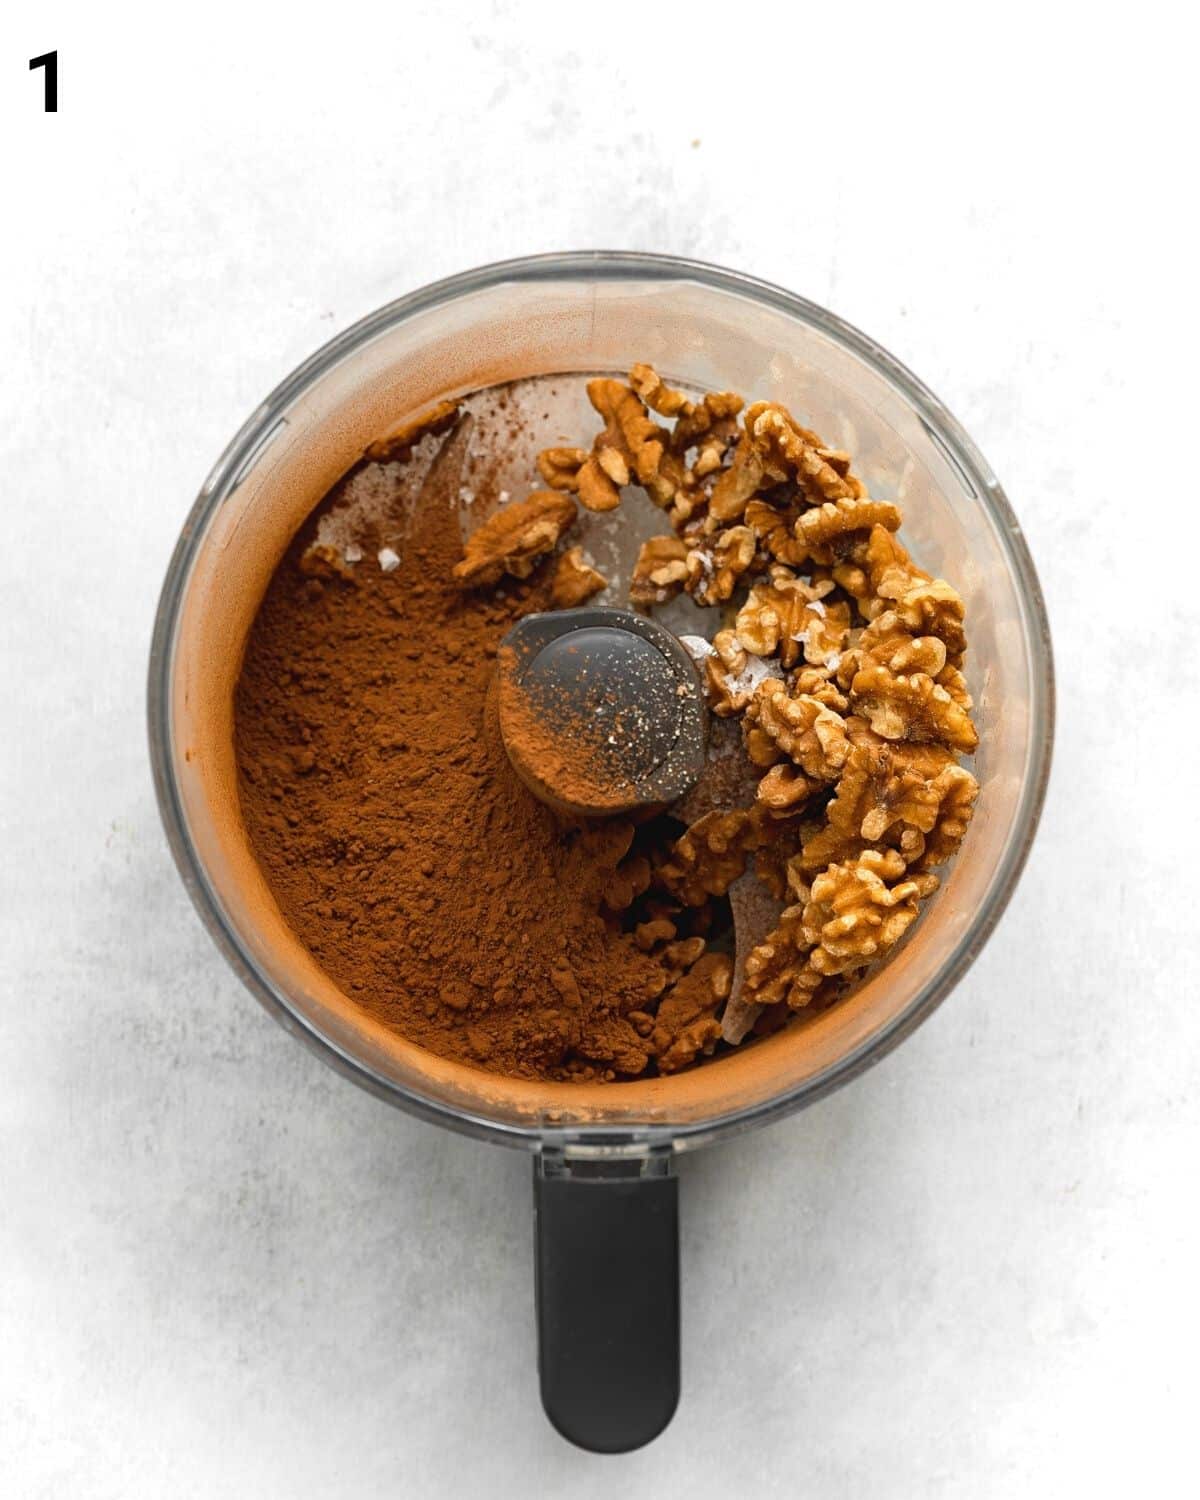
Vegan brownie base
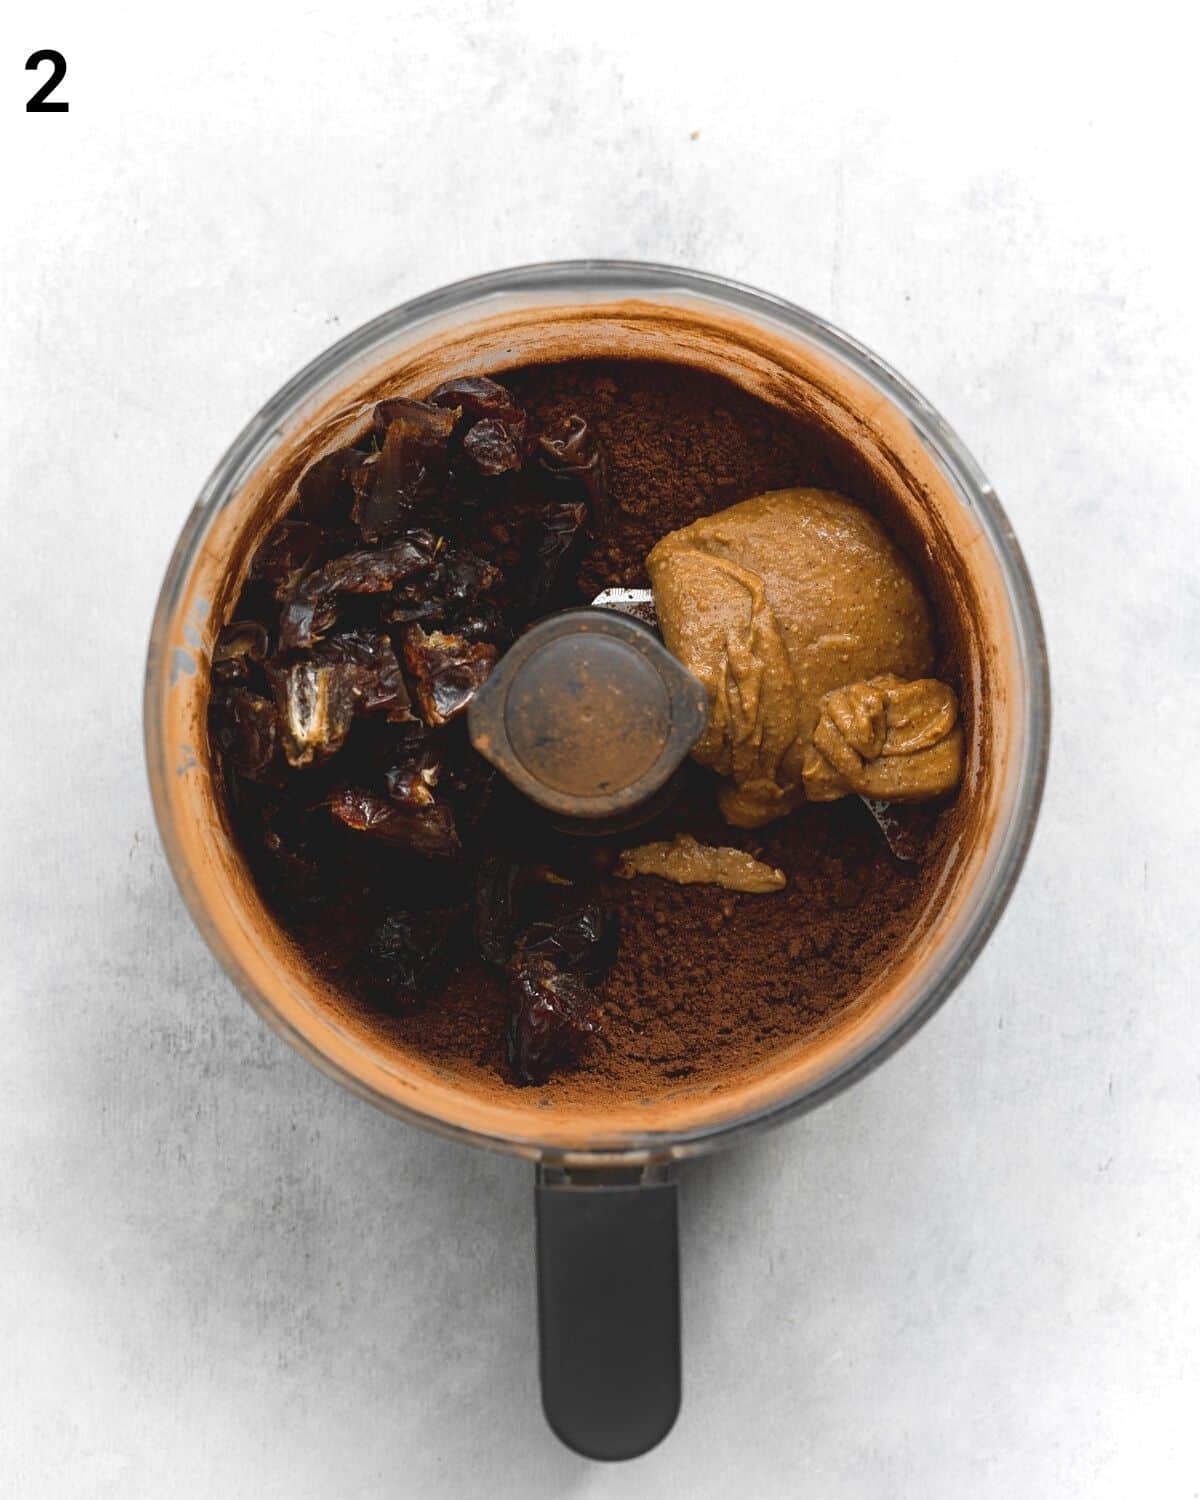
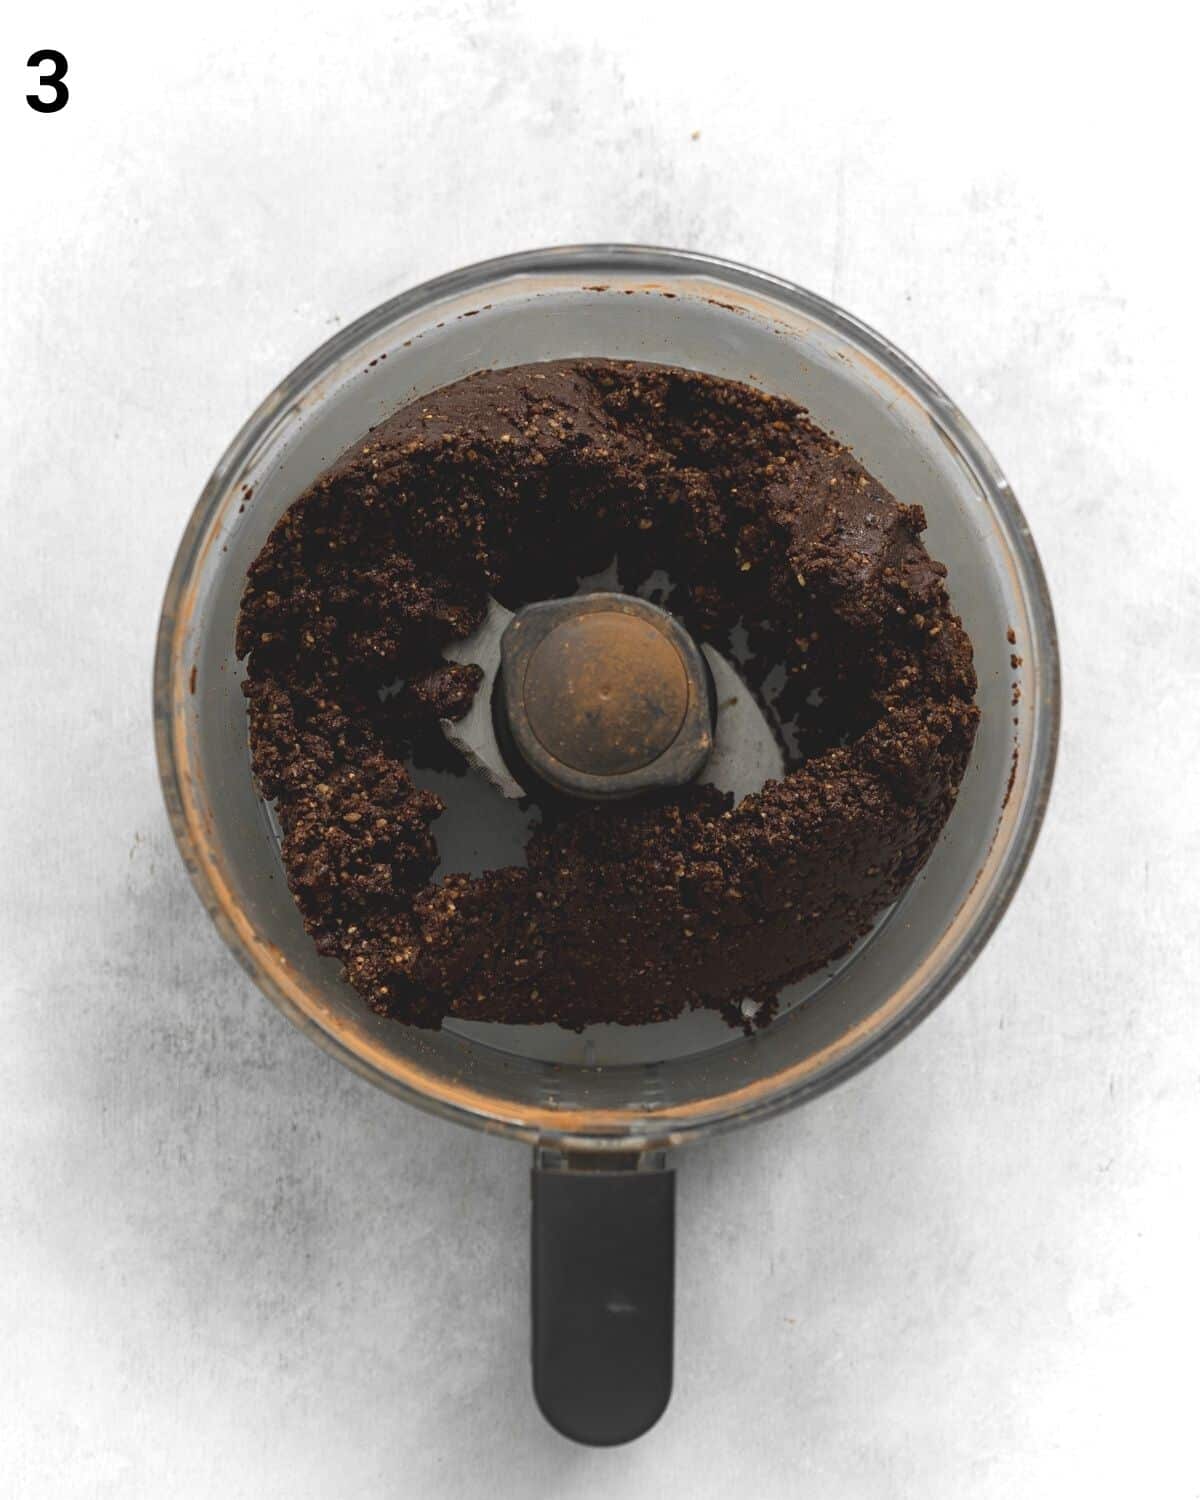
The no-bake brownie base comes together really easily in a food processor. To start, add the dry ingredients (cocoa powder, walnuts, and salt) and process them until they form a light crumb consistency.
Then add in the wet ingredients, in this case, the dates and peanut butter, and blend again until you have a uniform brownie dough.
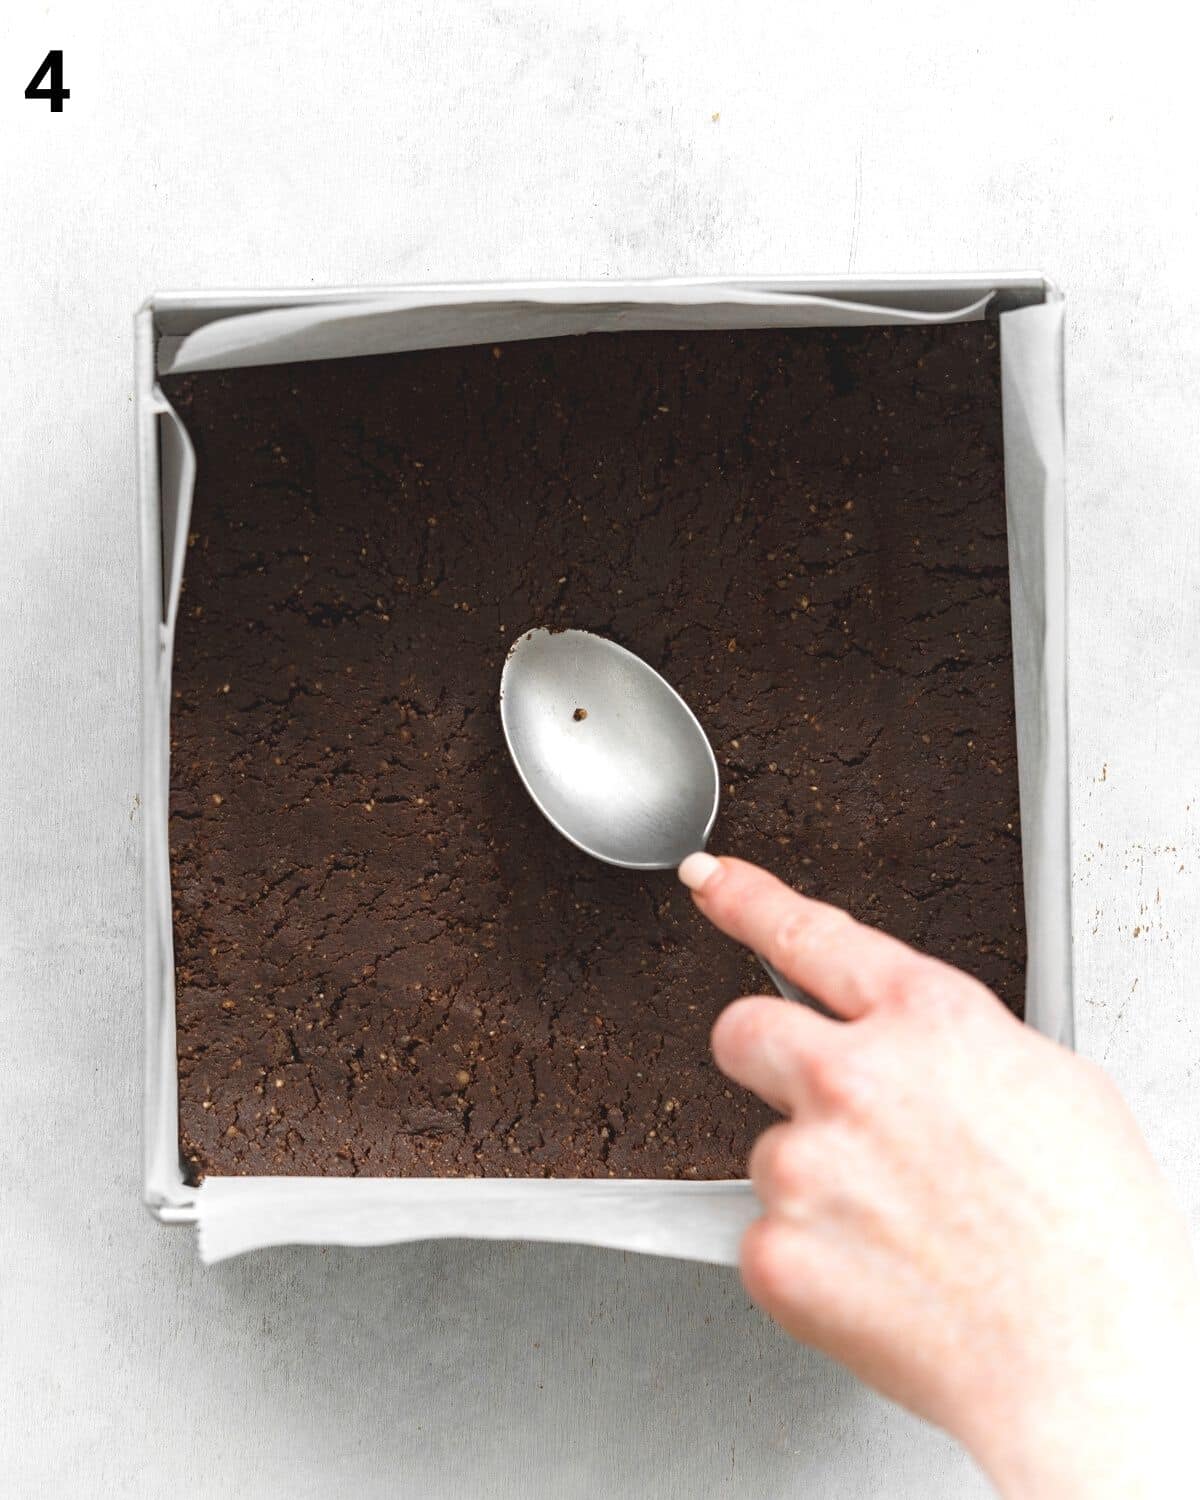
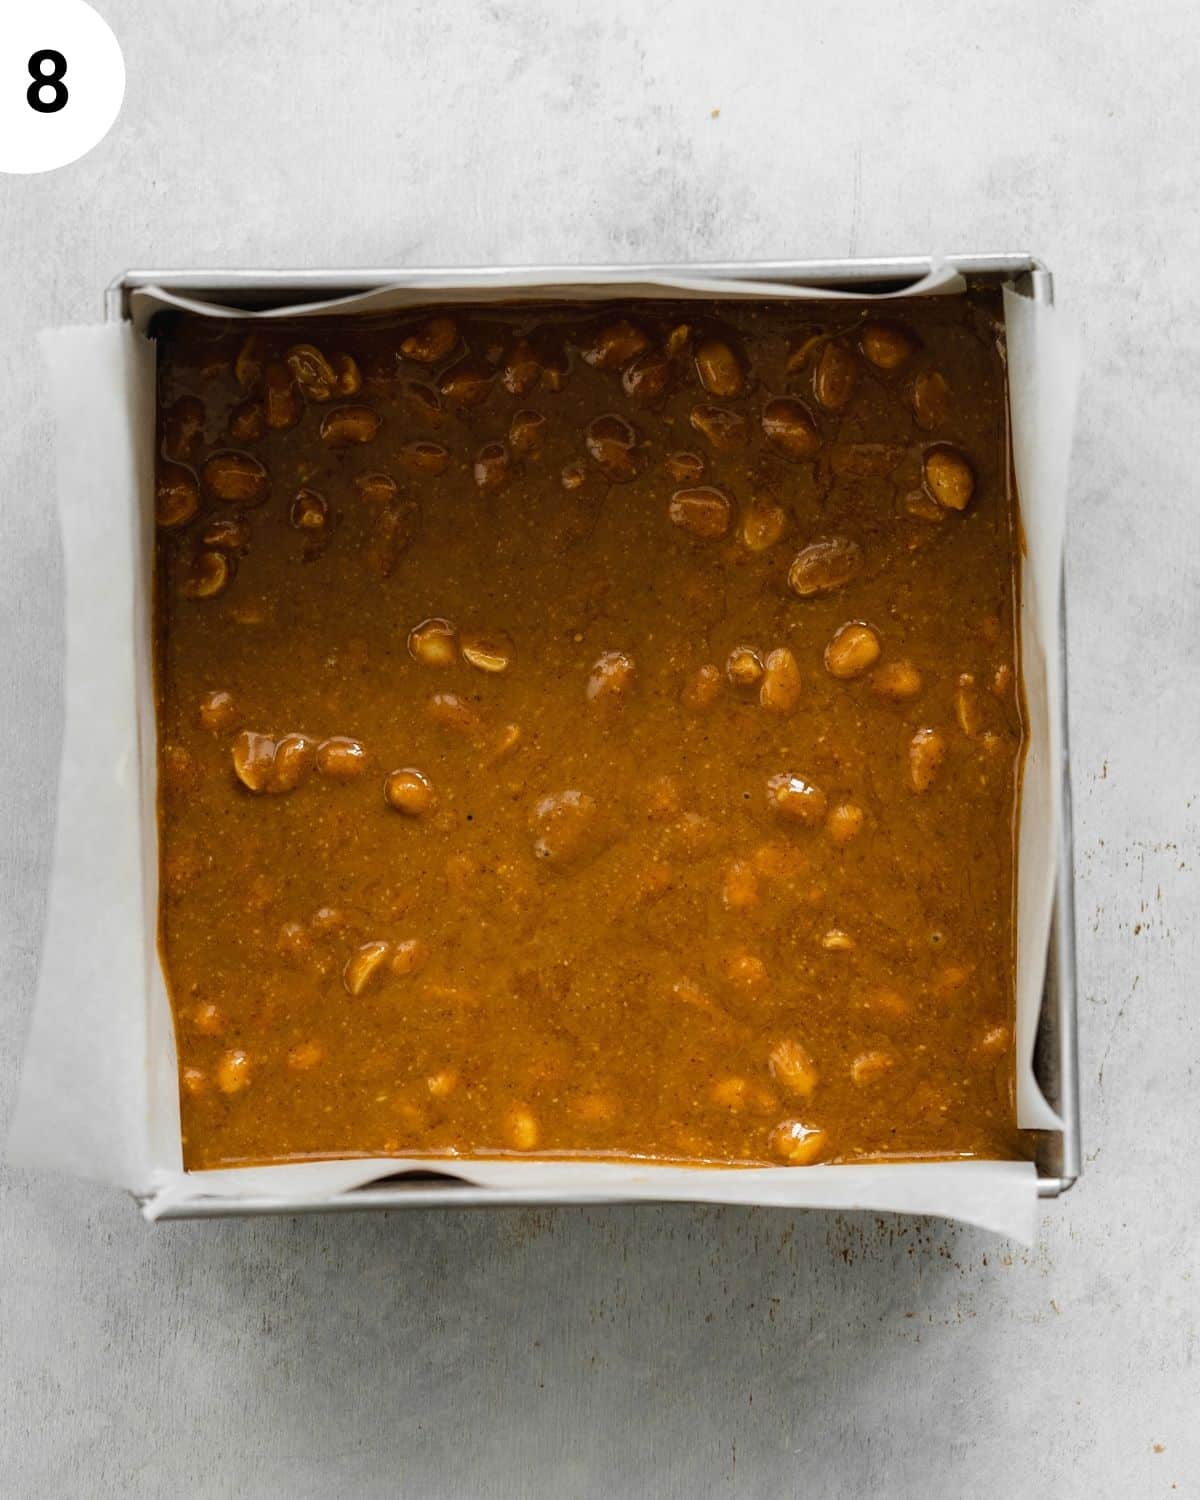
Using the back of a spoon or flat-bottomed glass, press the brownie mixture into the base of a prepared cake tin or baking dish lined with parchment paper.
Easy peanut butter caramel filling
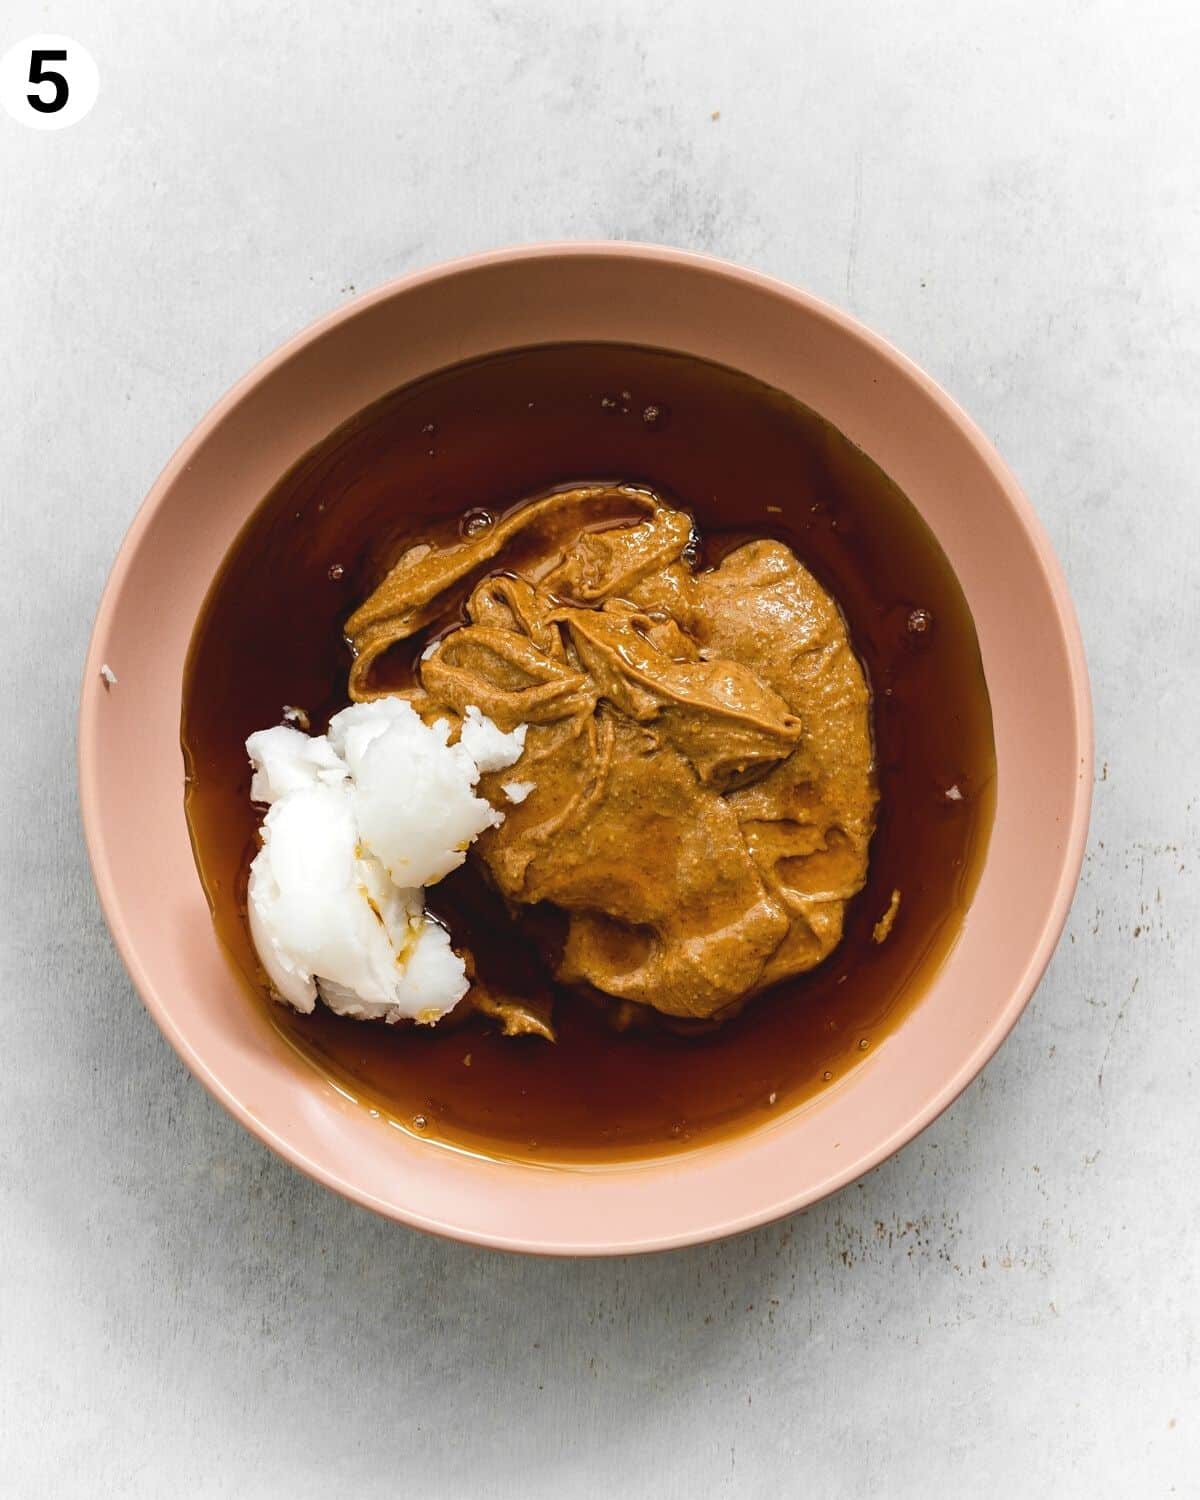
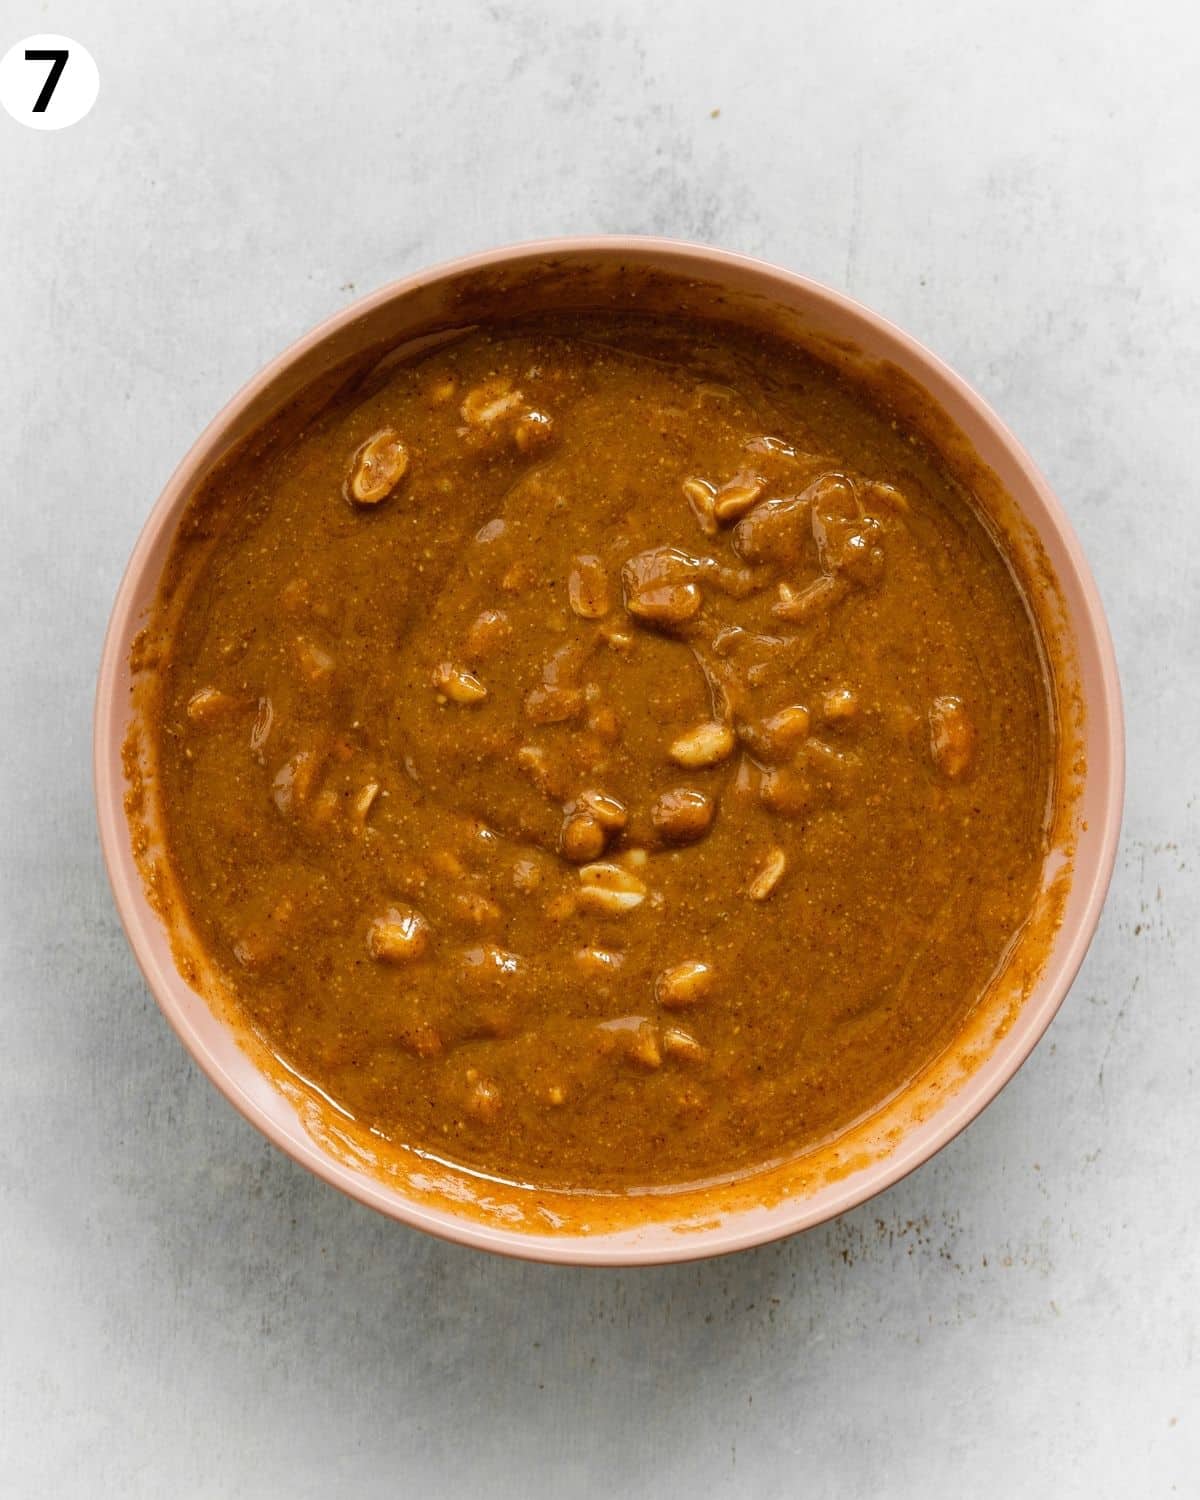
For the peanut butter filling, this recipe uses the same method as my peanut butter protein bars. Simply add all of the ingredients to a medium bowl (in this case peanut butter, maple syrup, vanilla, and coconut oil). Set the bowl on top of a saucepan with simmering water on low heat, which creates a double-boiler.
Heat gently until all of the ingredients melt, and whisk them until you have a smooth caramel consistency. Next, carefully remove the bowl from the heat and fold in the peanuts using a rubber spatula or spoon.
Pour the caramel mixture into the pan on top of the brownie layer and place it in the fridge to set completely for about 4 hours.

Peanut butter and chocolate topping
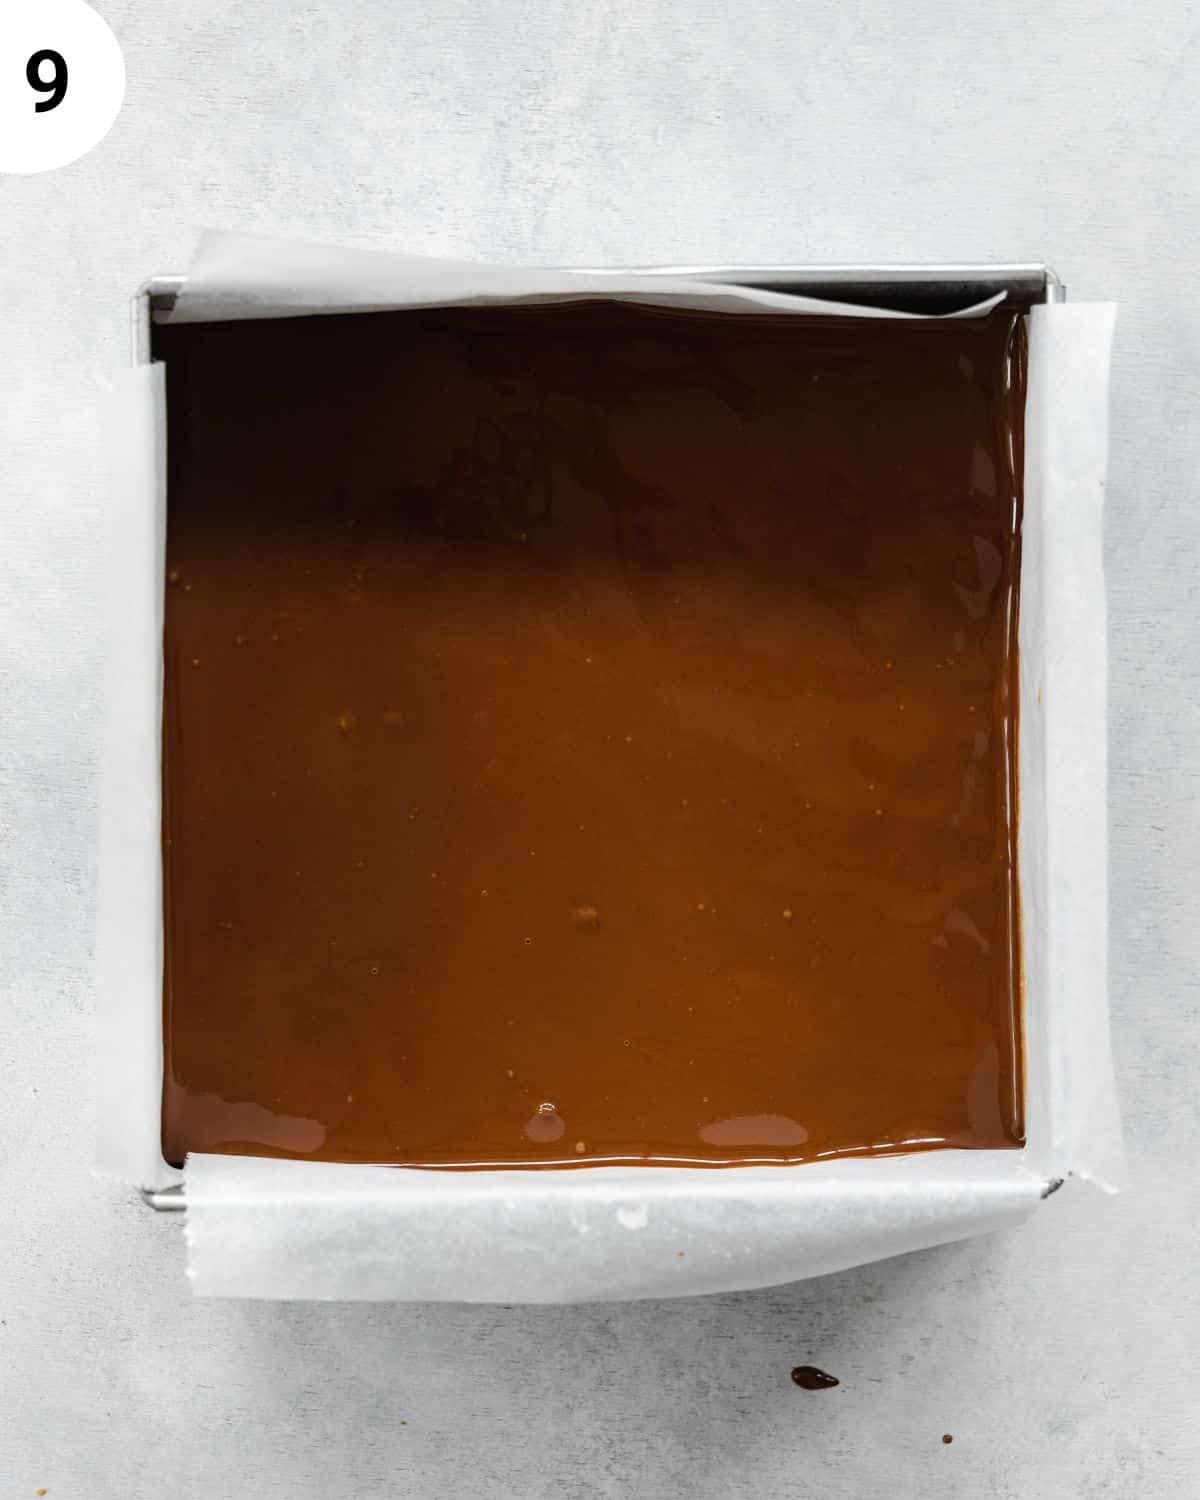
Once the caramel layer on top of the brownies is set, you can prepare the chocolate and peanut butter topping. Again, use a double boiler to melt the chocolate with one tablespoon of peanut butter. If the mixture is too thick, add a tablespoon of coconut oil and continue to heat and stir the chocolate until it has melted through.
Similarly, add the rest of the peanut butter to a heat-resistant bowl and melt it over a double boiler. If the peanut butter mixture is also too thick, add a little coconut oil to help thin it out. Both the melted chocolate and peanut butter should have a similar viscosity.
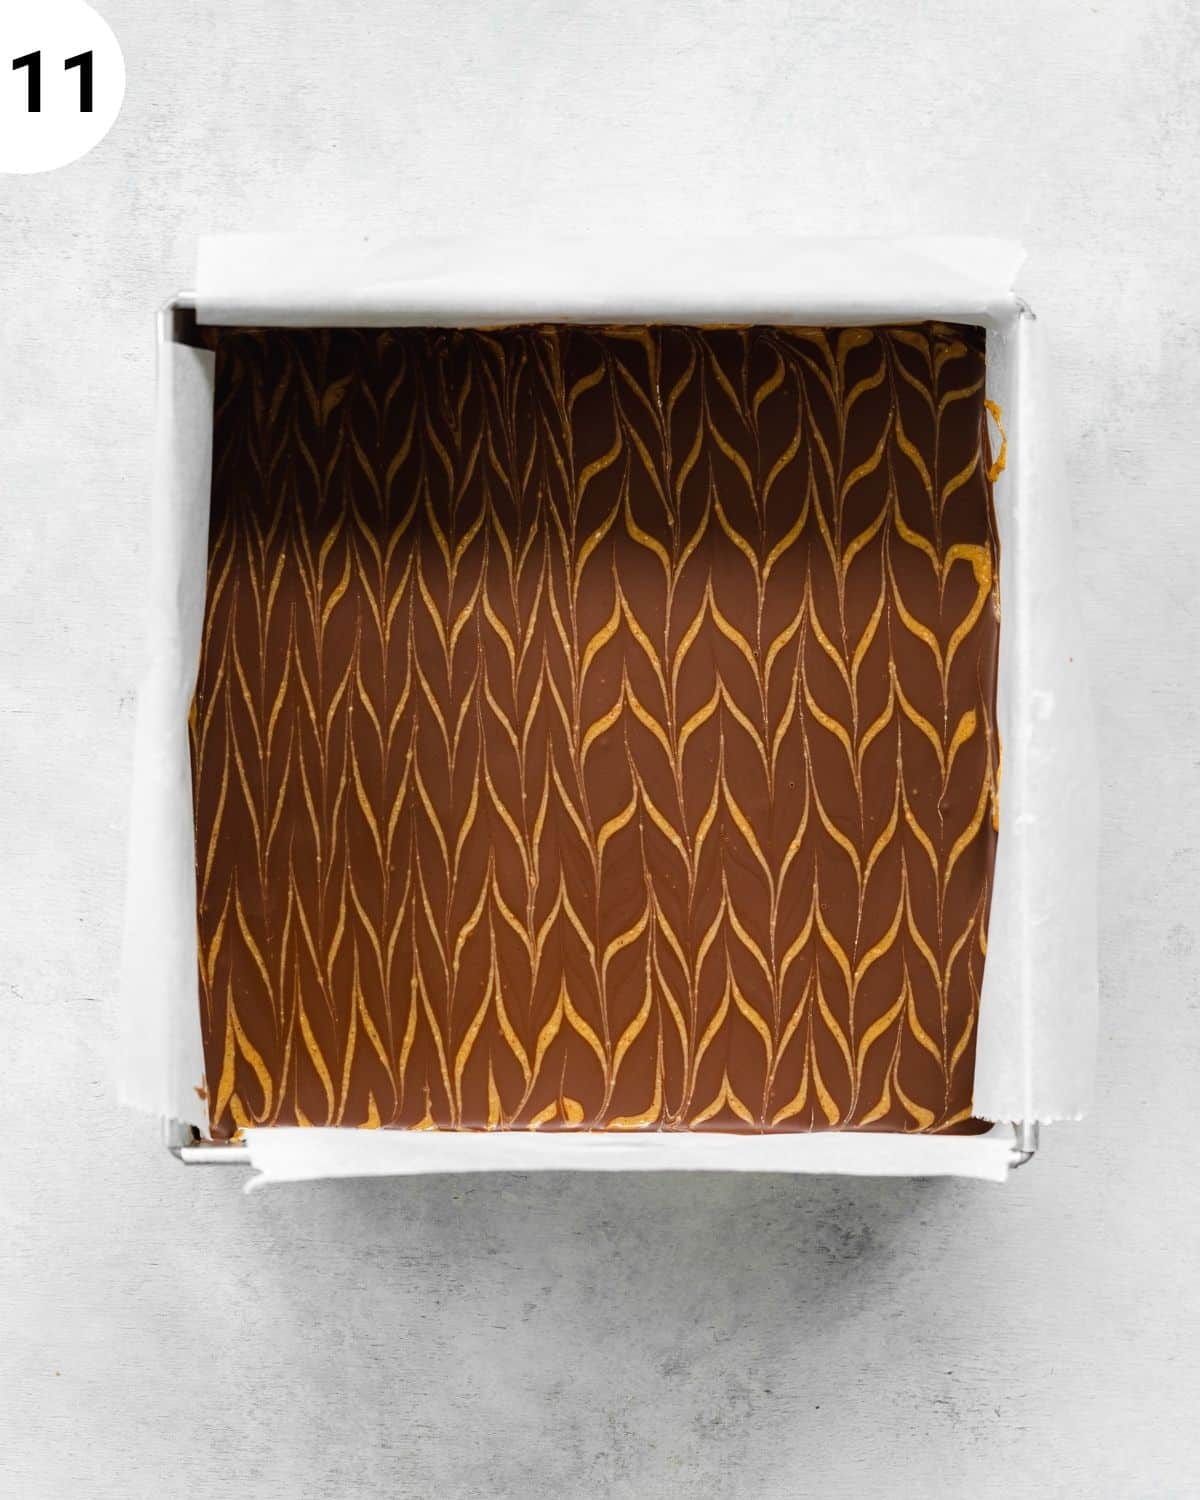
How to decorate vegan peanut butter brownies
Don't feel intimidated by the fan design on these brownies, it is actually pretty easy to do! The method is very similar to that of my peanut butter chocolate tart.
You want to get the melted chocolate and peanut butter to a similar consistency in order for the design to work best. So having a very thick chocolate layer and super runny peanut butter would be pretty hard to work with for example.
In order to get them to the same consistency, I recommend melting both the chocolate and peanut butter over a double-boiler or in 20-second intervals in the microwave. If the chocolate or peanut butter mixture is too thick, add a tablespoon of melted coconut oil to it which will help to thin it down.
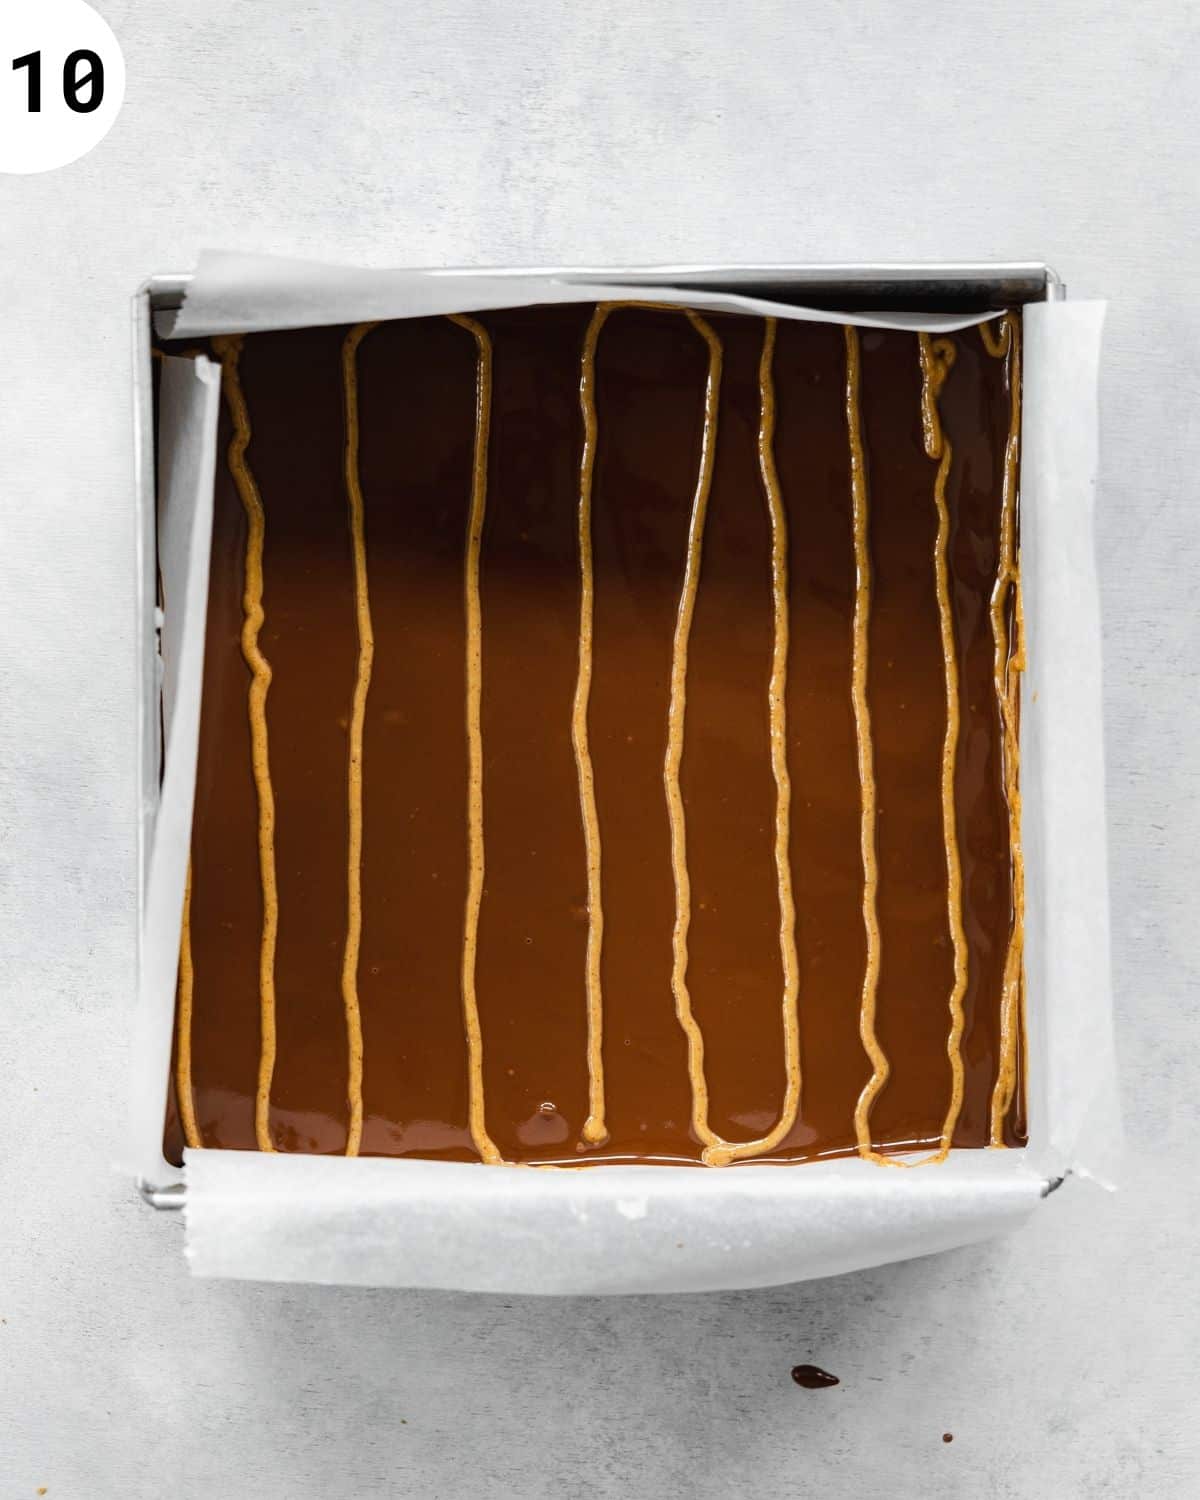
You can use a spoon for the peanut butter, but for precision, I recommend transferring it to a piping bag and cutting the bare end tip from it.
Add lines of the melted peanut butter on top of the chocolate layer. Then use a skewer to create a fan design, take the skewer, and move it across the lines in one direction, and then in the opposite direction. Repeat this process, alternating between going towards and away from yourself with the skewer.
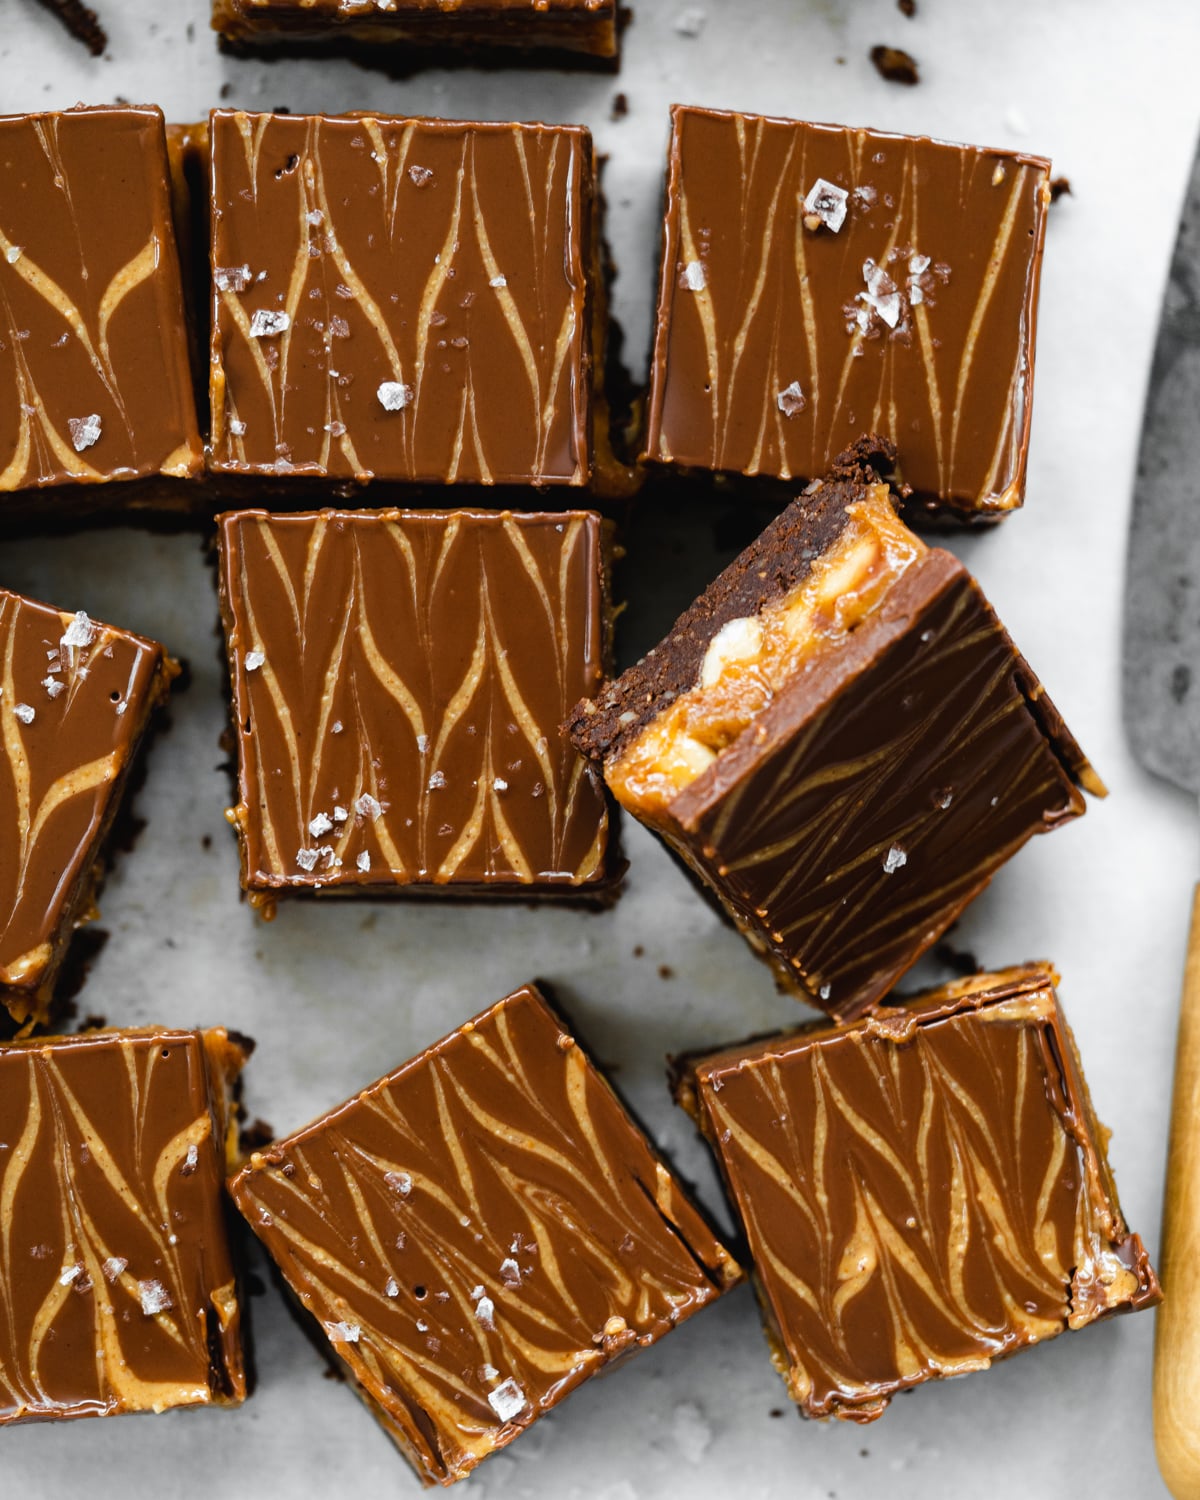
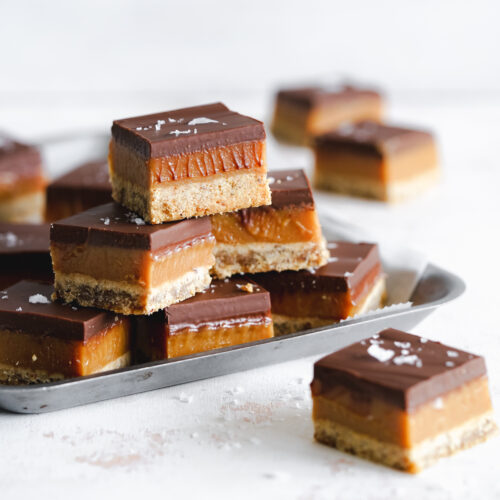
📝 How To Slice Perfect Brownies
We've all been there with uneven crumbly brownie slices. Slicing brownies evenly, however, takes a little bit of patience and precision.
First off, adding a little peanut butter, vegan butter, or coconut oil to the chocolate while melting helps immensely. The end result is that your chocolate won't set rock hard. You can also add a teaspoon of a liquid-based oil, like olive oil if preferred.
If you want to be really precise, you can use a measuring tape, and very gently mark out the cuts of where you want your slices/bars to be with the knife.
Use a large sharp knife, a chef's knife ideally if you have one at home. A blunt knife will do you no favors here.
Next, fill a jug with some hot water, grab a clean tea towel and keep that to hand. Dip the knife in the hot water and wipe it clean so that it is hot before slicing the brownies.
Cut slowly, applying pressure to the pre-cut knife markings until you can see that the knife has made its way through the chocolate, then press down to cut through the caramel and brownie layers. And there you'll have perfectly cut brownies!
💬 FAQs
Store these vegan brownies in the fridge in order to keep them fresh as long as possible.
Place them in an airtight container or wrap them well and they will keep for up to a week.
These peanut butter brownies freeze really well. You can freeze any leftover brownies and defrost them as needed.
Make sure they are wrapped well or in an airtight container and freeze for up to a couple of months. Allow at least an hour to defrost them before serving.
🍫 More Brownies & Bars
Love this recipe? Please leave a 5-star ★★★★★ rating in the recipe card below and consider leaving a comment as well, thanks!
Stay in touch with me through social media @ Instagram, Pinterest, TikTok, and Facebook. And if you like one of my recipes, tag me
📖 Recipe
Vegan Peanut Butter Brownies (No Bake)
Ingredients
Brownie
- 150 g (1 ⅓ cups) walnuts
- 50 g (⅔ cup) cocoa powder
- ¼ teaspoons (¼ tsp) sea salt
- 150 g (1 cup) medjool dates pitted
- 80 g (⅓ cup) smooth peanut butter
Peanut butter caramel
- 260 g (1 cup) smooth peanut butter
- 175 ml (¾ cup) pure maple syrup
- 55 g (¼ cup) coconut oil solid
- 1 teaspoon (1 tsp) vanilla extract optional
- 100 g (⅔ cup) roasted peanuts
Topping
- 200 g (7 oz) vegan chocolate
- 100 g (⅓ cup) peanut butter
Instructions
Brownie
- Add the walnuts, cacao powder, and salt to your food processor and blitz until they form a light crumb consistency. Add the dates and peanut butter blend further for a couple of minutes until the mixture starts to stick together to form a dough.
- Line an 8x8" square cake tin with parchment paper and press the brownie dough evenly into the base of the pan using a spoon or flat-bottomed glass.
Peanut butter caramel
- Add the peanut butter, maple syrup, coconut oil, and vanilla to a heat-resistant bowl. Heat over a double boiler (bain-marie) while stirring until all of the ingredients have melted into a smooth caramel.
- Remove the bowl from the heat and fold the peanuts into the caramel using a rubber spatula. Use a spatula to evenly spread the caramel over the brownie base and place it in the fridge to set for 3-4 hours.
Topping
- Melt the chocolate and 2 tbsp (30g) of peanut butter over a double boiler (bain-marie) and stir to combine. In a separate bowl, heat the remaining peanut butter over a double boiler. The consistency of both the melted chocolate and melted peanut butter should be similar. If one of them is too thick, add a little coconut oil and stir well to help thin it out.
- Pour the melted chocolate over the peanut butter caramel layer. Transfer the melted peanut butter to a piping bag (or use a spoon) to create lines of peanut butter on top of the chocolate (refer to images in the blog post if needed). To make a fan design, take a wooden skewer and move it across the lines in one direction, and then in the opposite direction. Repeat this process alternating between going towards and away from yourself with the skewer.
- Carefully transfer the brownie tin back into the fridge to chill for another 20-30 minutes.
- To slice, place a sharp knife in a jug of boiling water to heat it. Wipe the knife dry and gently cut, allowing the heat from the knife to melt through the slices.
Storage
- Store these vegan brownies in the fridge in order to keep them fresh as long as possible. Place them in an airtight container or wrap them well and they will keep for up to a week. You can freeze any leftover brownies and defrost them as needed. Make sure they are wrapped well or in an airtight container and freeze for up to a couple of months. Allow at least an hour to defrost them before serving.
Notes
- Use a large sharp knife for slicing, a chef's knife ideally if you have one at home. Dip the knife in the hot water and wipe it clean so that it is hot before slicing the brownies.
- If you want really precise slices, you can use a measuring tape, and very gently mark out the cuts of where you want your slices/bars to be with the knife.
- Cut slowly, applying pressure to the pre-cut knife markings until you can see that the knife has made its way through the chocolate, then press down to cut through the caramel and brownie layers.
© addictedtodates.com. All content and images are protected by copyright. If you want to share this recipe, please do so using the share buttons provided. Do not screenshot or republish the recipe or content in full. Instead, include a link to this post for the recipe. Thank you!
This is more of a review of the concept because I made quite a few changes that probably mean I didn't make this quite as intended. I used pistachio butter instead of peanut butter, which is a fair bit thicker/more dry. As a result, my peanut butter layer was more of a foam than a cream. However, it was very nice. I also didn't use as much chocolate on the top, so it was more of a thin layer that was easy to cut. I thought these were great, although my partner thought the brownie layer was a bit dry.
One question, though: with the peanut butter caramel, the recipe suggests using 3/4 cups maple syrup. I thought this sounded like a lot, so I just added 1/4 cup, and it was extremely sweet. I ended up having to dilute it with more nut butter to make it palatable. So, I wonder if 3/4 cup is correct-- because that's an awful lot of maple syrup.
Hi Sean,
Thanks so much for taking the time to share such a thoughtful review, I really appreciate it. And I love how you adapted it to suit your taste (the pistachio butter swap sounds delicious, even if it did change the texture a bit).
On the maple syrup: yes, the ¾ cup is correct. That layer is intended to be more of a caramel than a nut-butter cream, and caramel is naturally very sweet. That said, it’s absolutely fine to adjust it to your own taste, especially if you prefer something less sweet or are using a thicker, drier nut butter like pistachio butter. Adding more nut butter, as you did, is a good way to rebalance it.
Thanks again for the feedback — it’s always really helpful to hear how people adapt the recipes and how they turn out in different kitchens.