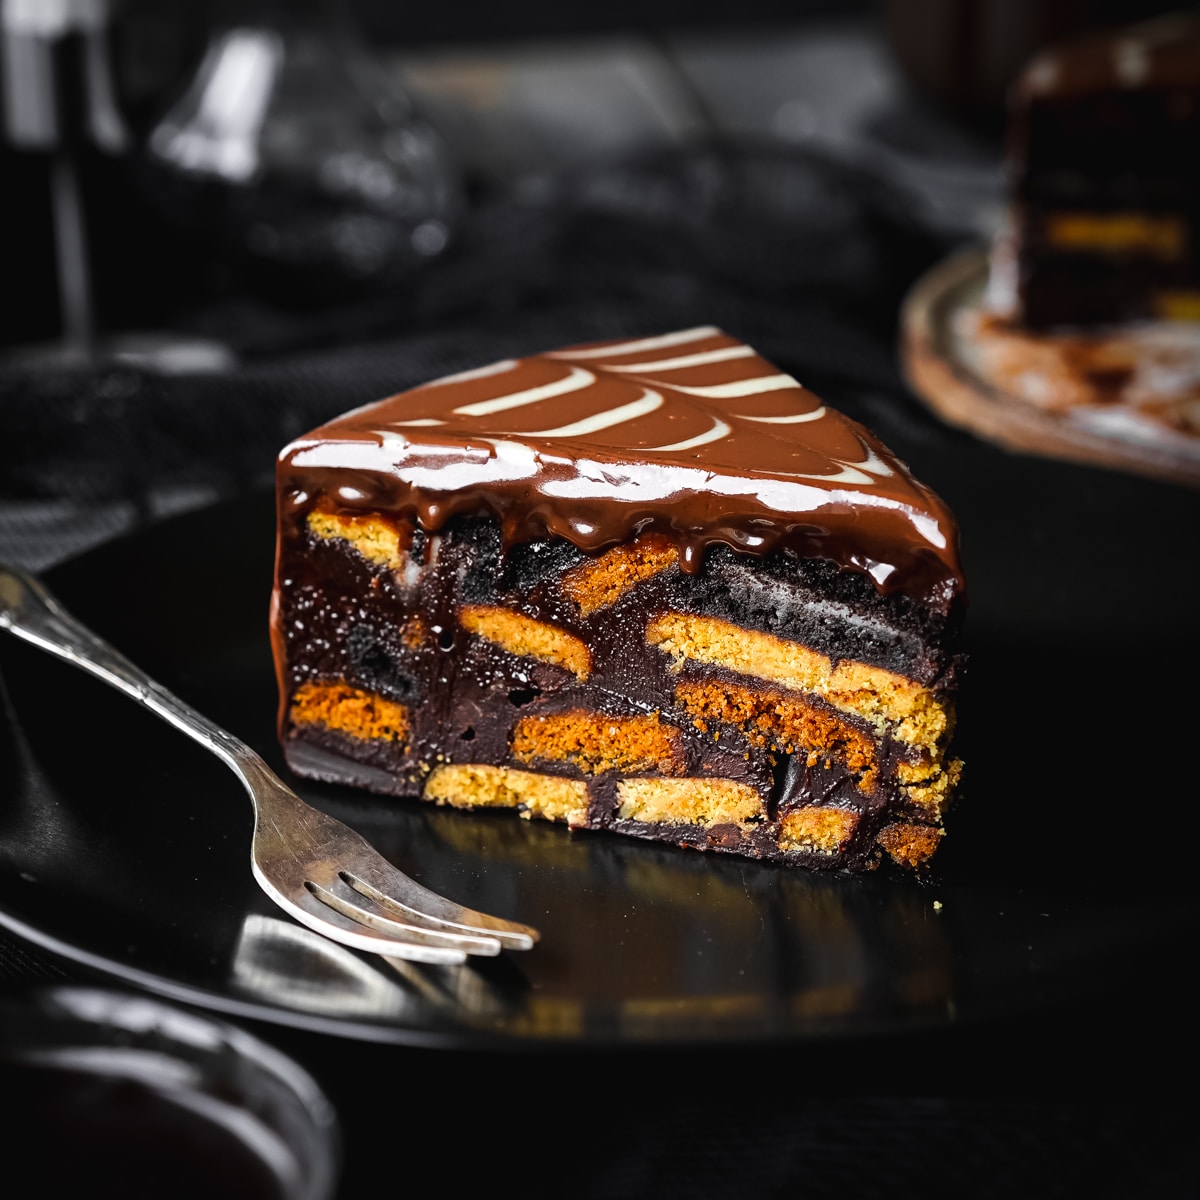
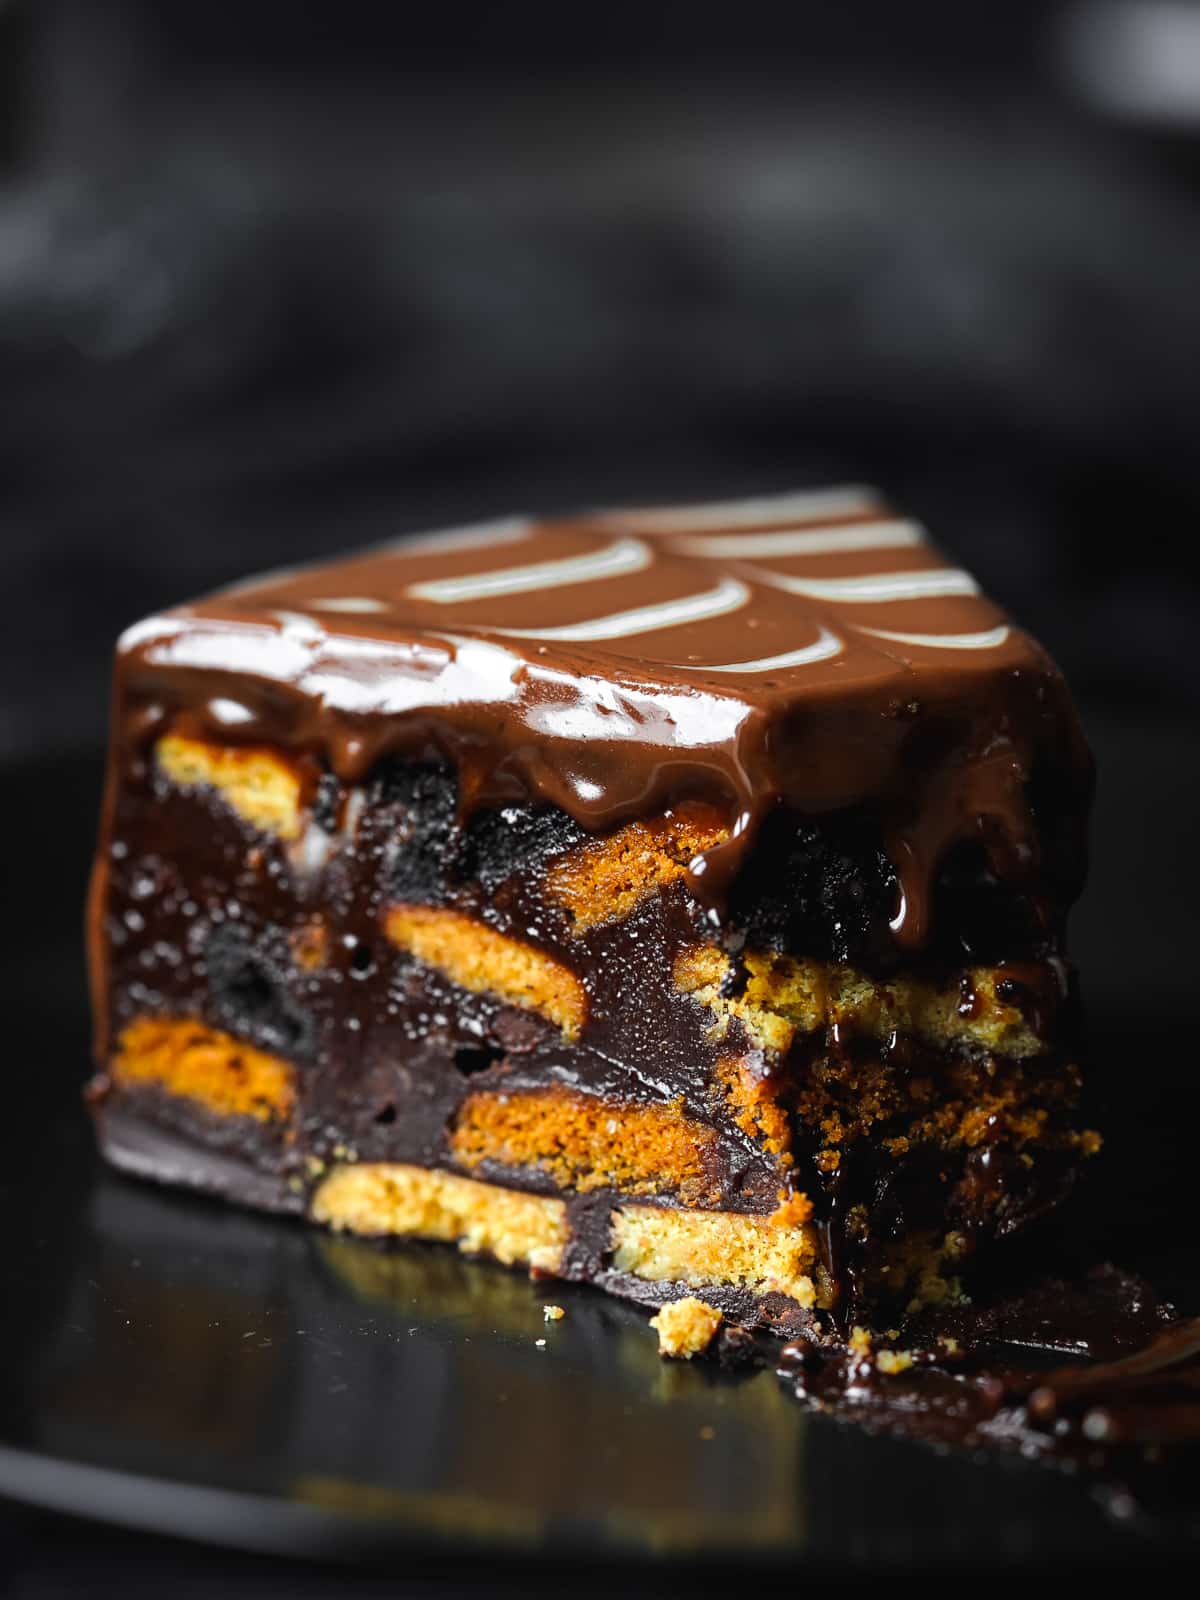
With a rich fudgy chocolate filling loaded with cookie pieces, this cake can be made in under 20 minutes of hands-on time.
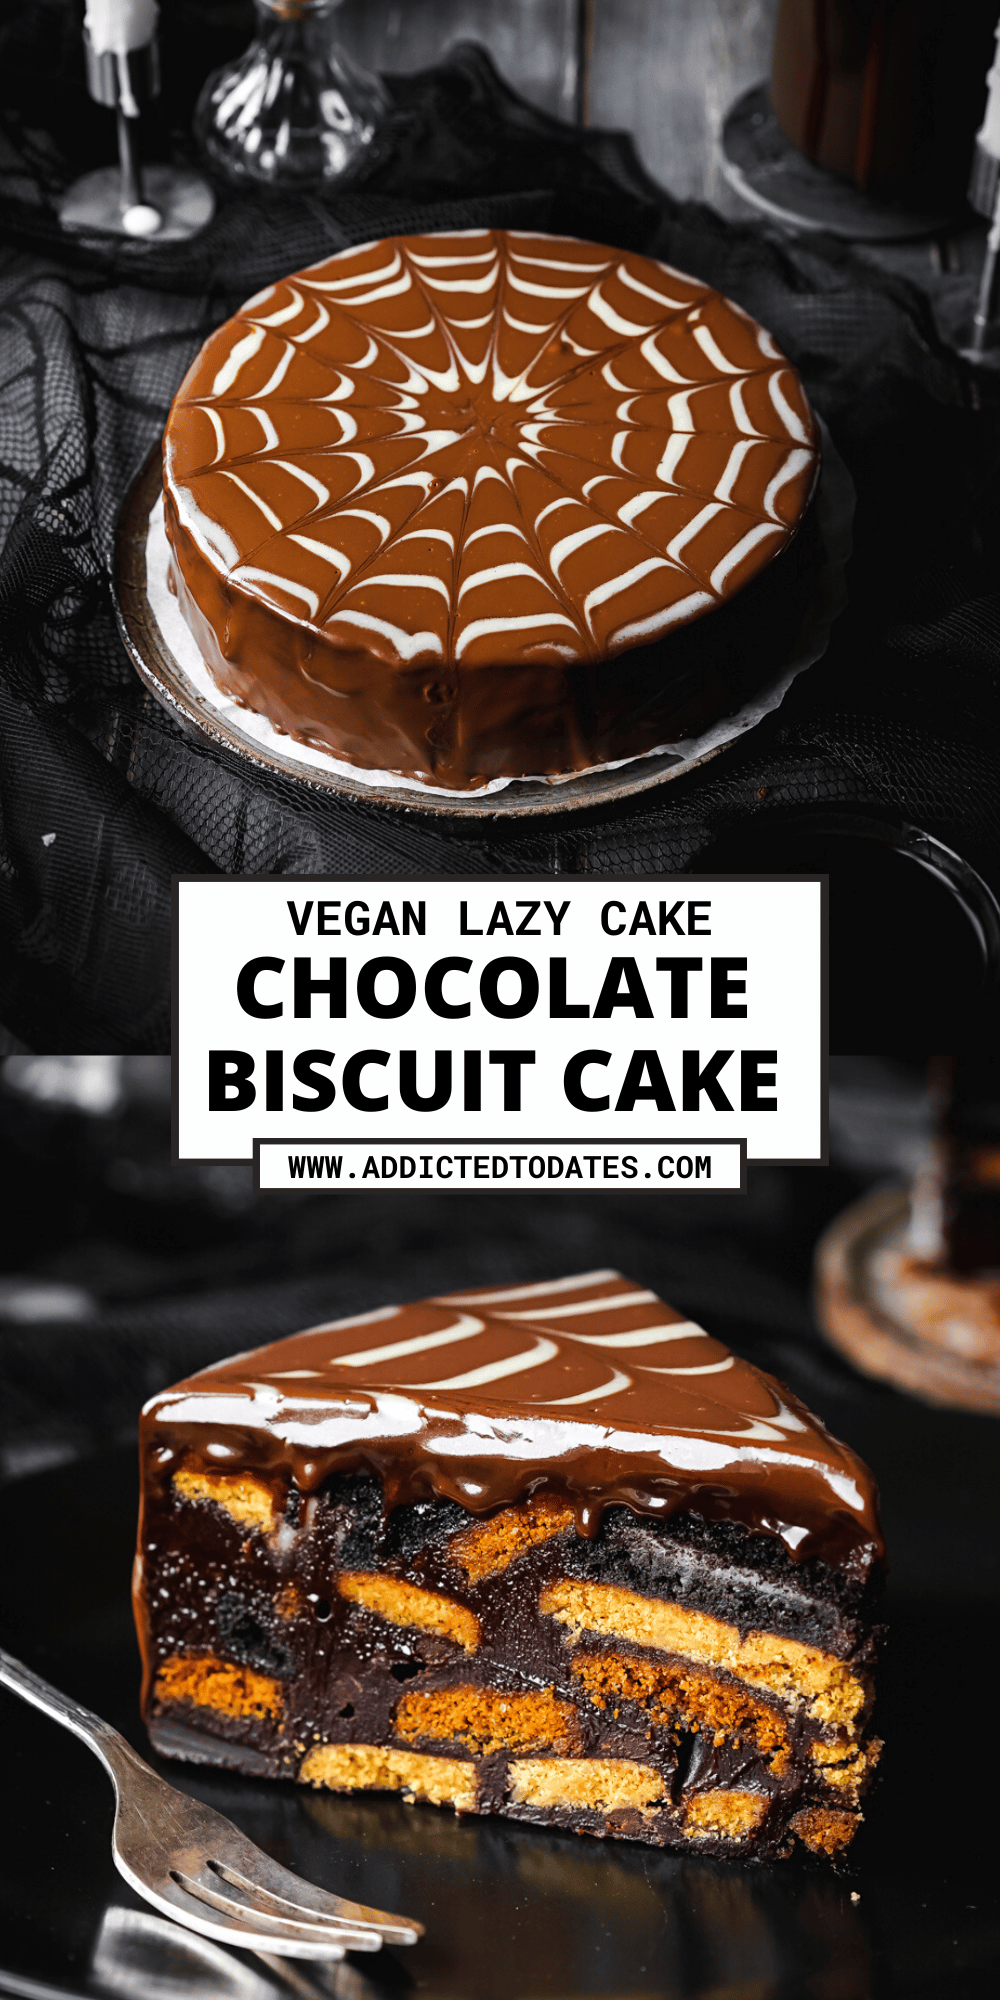
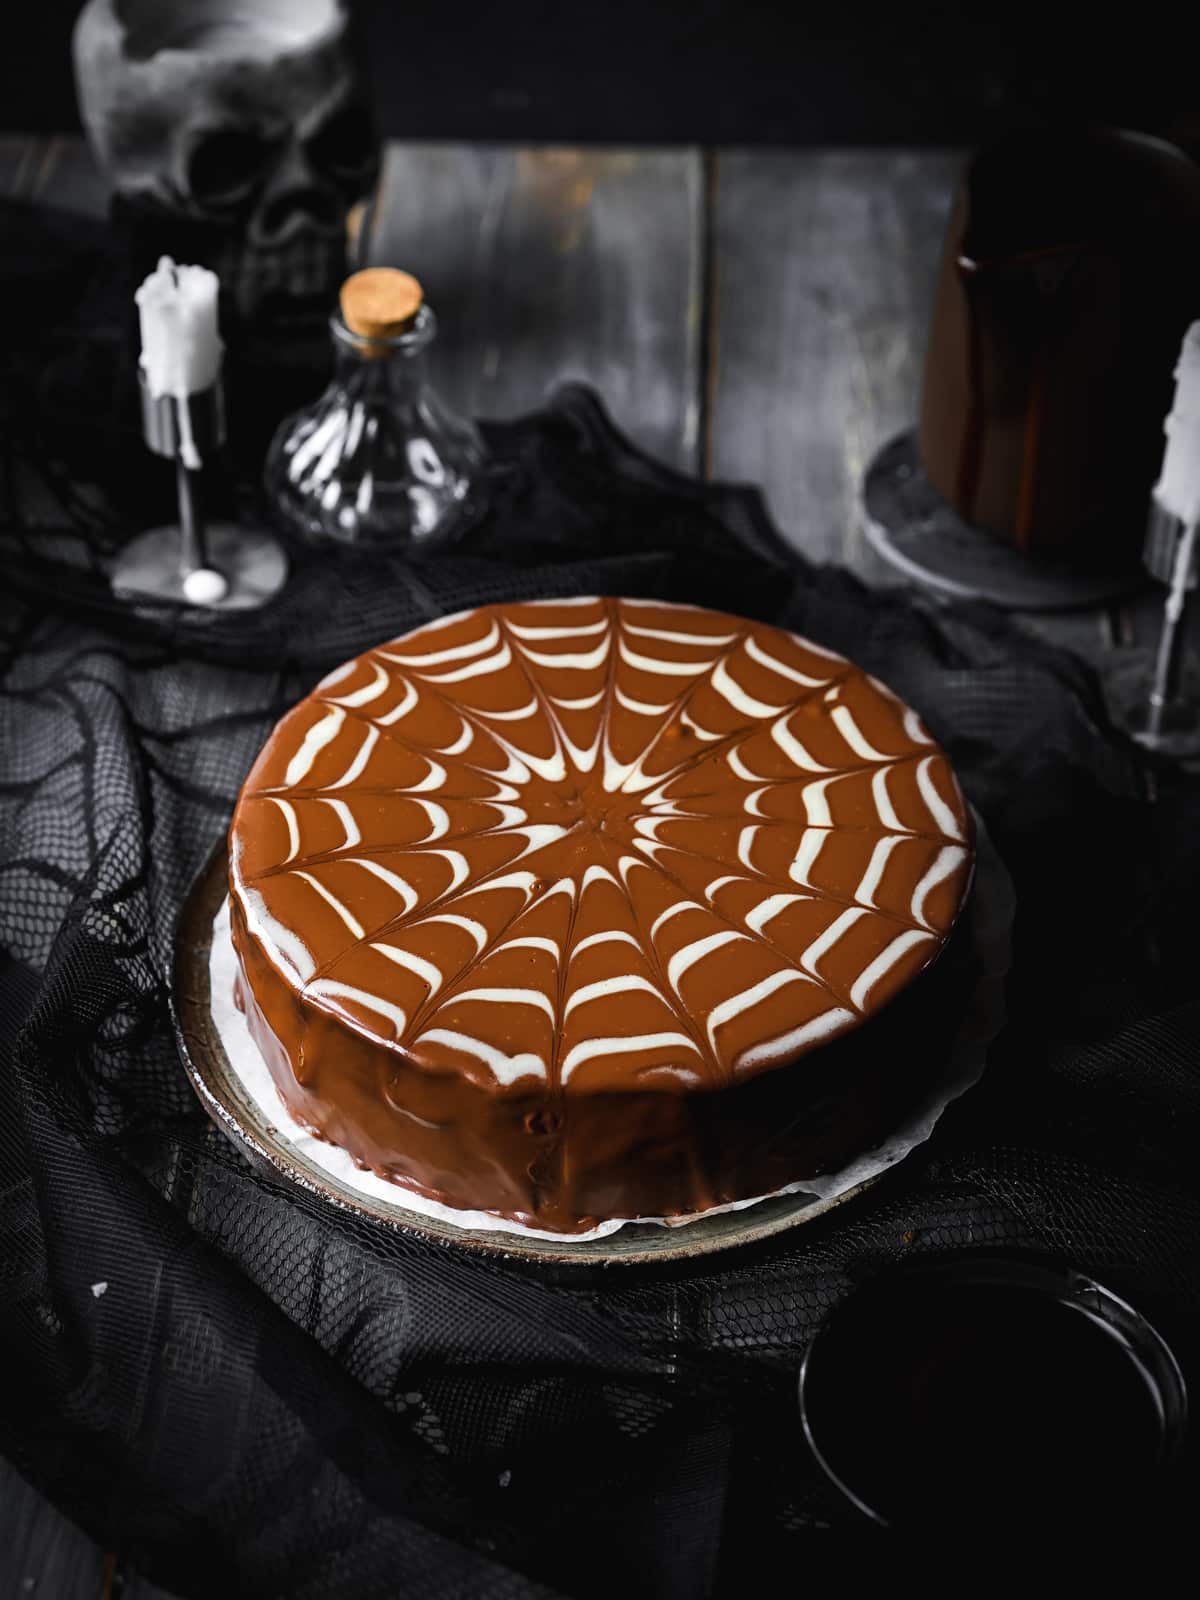
This delicious chocolate biscuit cake is ridiculously easy to make if you go for the cake on its own. Or add some wow factor with a chocolate glaze and spider web design, perfect for Halloween!
Jump to:
📝 What Is Lazy Cake?
A Lazy Cake is an easy no-bake chocolate cake filled with broken biscuit pieces. It's otherwise known as Chocolate Biscuit Cake or Chocolate Fridge Cake. Popular in Europe and the Middle East, it takes on many different names depending on the country.
In Italy, it's enjoyed as Chocolate Salami Cake (Salam de Biscuit), or as German Kalter Hund, and it's known as a Kormos log in Greece where it is made into an easy log-shaped dessert.
You may also see it referred to as Chocolate Mosaic Cake or Chocolate Tiffin Cake!
As the name "Lazy Cake" suggests, this dessert is a great option when you're short on time as there is very little preparation involved. Being a no-bake dessert, it's also great for a hot summer day when you don't want to heat up the oven.
You might also enjoy this vegan sticky toffee pudding, which is a British classic!
🧾 Ingredients Needed
Here's everything you need to make this easy lazy cake recipe from scratch:
Ingredient Notes
Find the complete list of ingredients, quantities, and instructions in the recipe card at the end of this post.
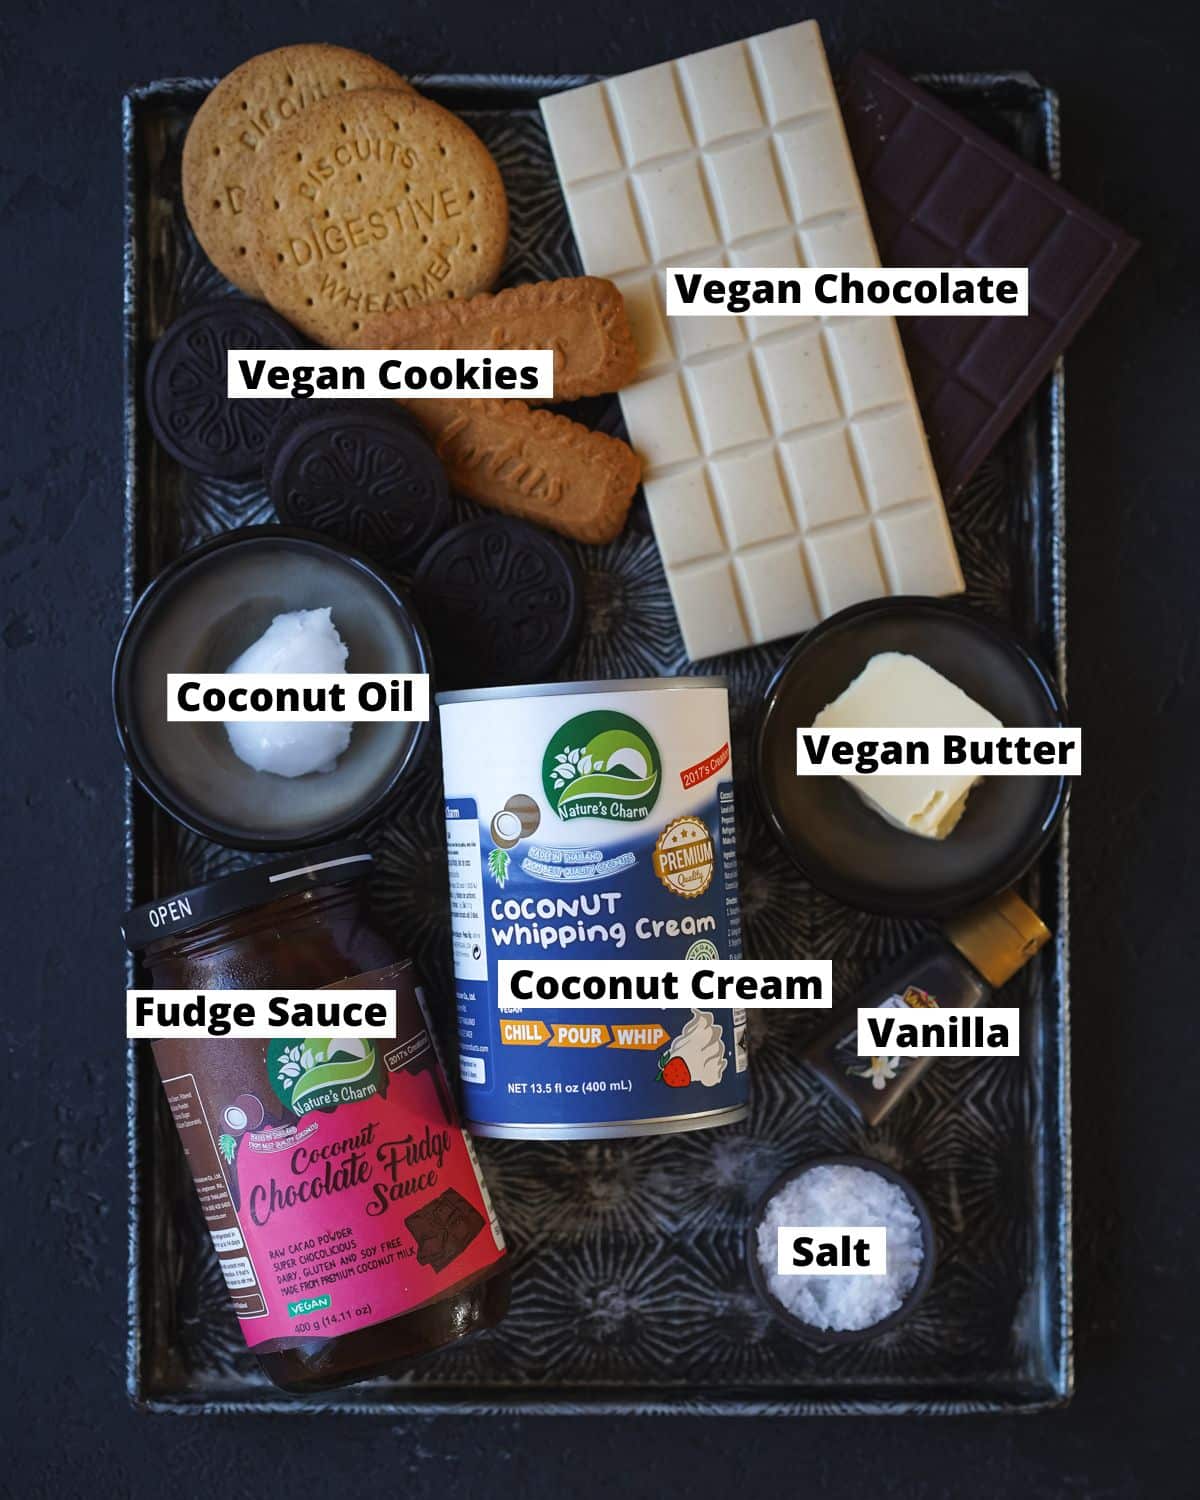
- Dark Chocolate: Use good quality dark chocolate with at least 70% cocoa solids rather than baking chocolate chips. The non-dairy white chocolate and coconut oil are optional, depending on whether you're adding a design to the top of the cake.
- Vegan Cookies: You can pretty much use your favorites here. I use a combination of digestive biscuits, Lotus biscoff, and Oreo-style sandwich cookies. You can also use gingerbread, vanilla wafers, tea biscuits, vegan graham crackers, or any that you need to use up!
- Vegan Fudge Sauce or Condensed Milk: Gives the filling an amazing flavor and helps prevent the glaze from cracking when you cut into the cake. You can swap the fudge sauce for vegan sweetened condensed milk.
- Coconut Cream: You can also use full-fat canned coconut milk. Refrigerate the can overnight and use only the thick part from the top.
- Vegan Unsalted Butter: Use dairy-free stick butter, not the spreadable kind from a tub.
Get Your Free E-Book!
Sign up to the Addicted to Dates newsletter for your FREE Guide To Vegan Cheesecakes!
🔪 Instructions
Here are step-by-step images showing how to make this no bake chocolate biscuit cake. Please refer to the detailed printable recipe card at the end of this page for full measurements and written instructions:

Step 1: Slowly melt the chocolate biscuit cake filling ingredients over a double boiler. Separate 100g of the mixture and set aside for topping the cake.
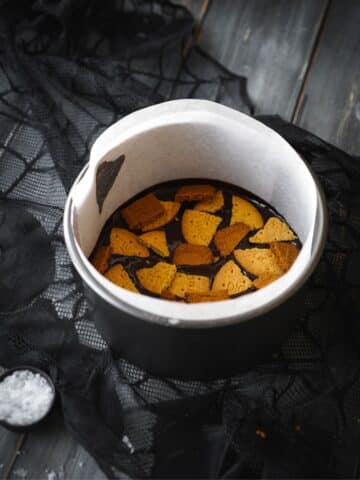
Step 2: Add 4-5 tablespoons of the chocolate filling to the base of the lined cake tin. Follow this with a layer of cookie pieces.
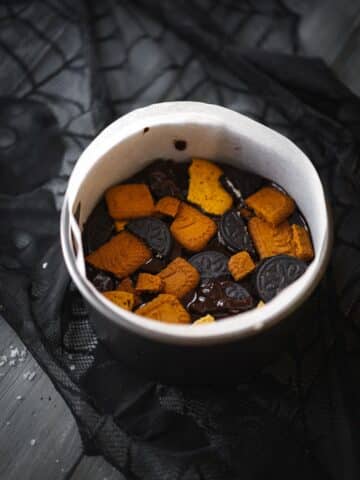
Step 3: Repeat the layers until you have used all of the main chocolate filling.
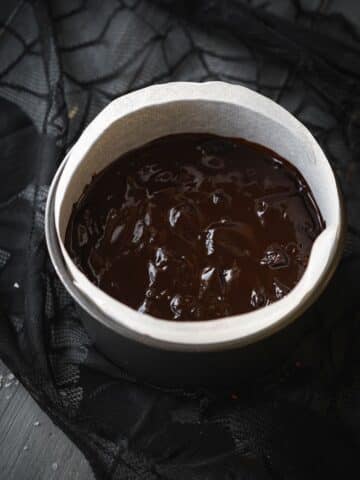
Step 4: Pour the reserved 100g of chocolate mixture on top of the cake, and tap the pan on your counter to level out the ingredients and knock out any air bubbles.

Step 5: Heat the coconut cream over a double boiler and pour it into a bowl with finely chopped chocolate. Allow it to sit for 2-3 minutes uncovered, then stir in the chocolate fudge sauce.
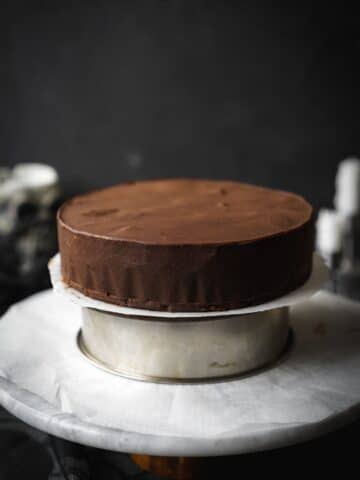
Step 6: Demold the cake and remove the parchment paper from the sides. Place the cake on top of an upside-down cake tin and place it into a large bowl (this is to catch the melted chocolate glaze that flows over).

Step 7: Pour the room-temperature chocolate sauce over the top of the cake and allow it to run down the sides to completely cover the cake.

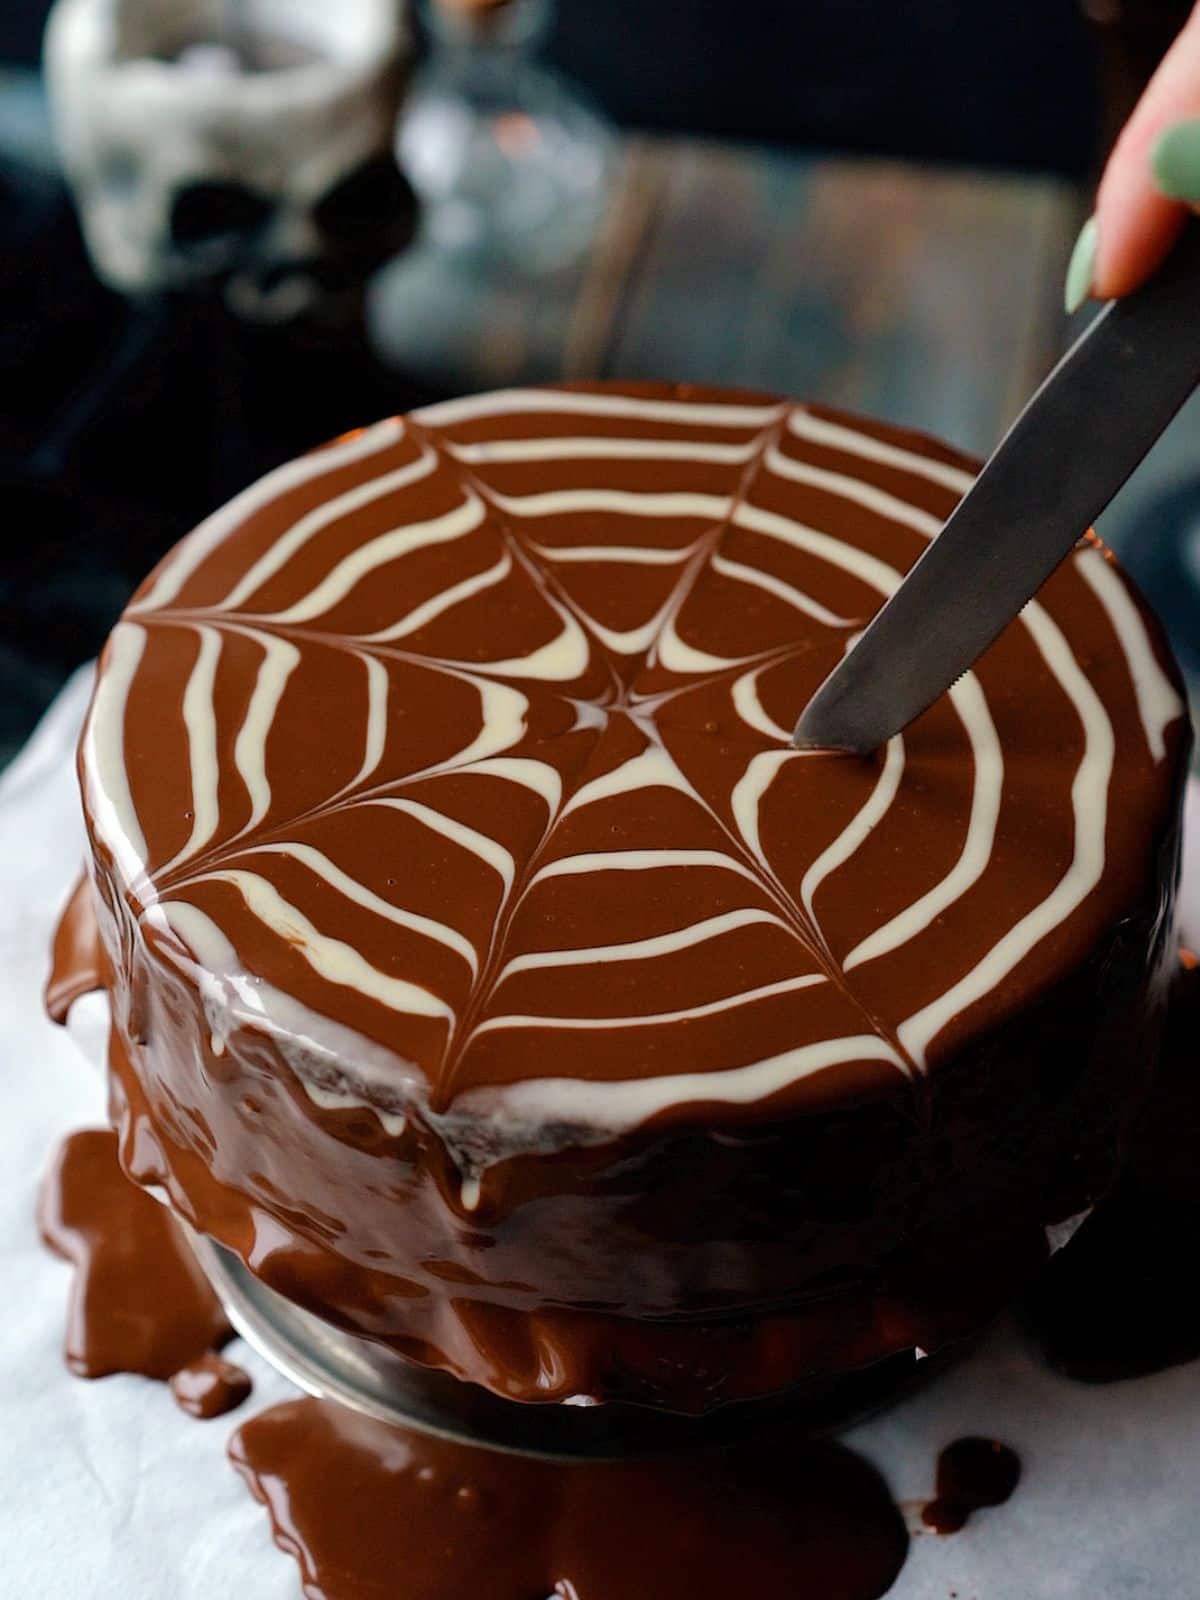
Step 8: Pipe a swirl of melted white chocolate on top of the cake. Take a wooden skewer or knife and move it across the lines in one direction to create a web design.
💭 Recipe Tip
Use a rotating cake stand so that you can easily create the white chocolate swirl effect. This way, the turntable will do the work for you!
🍽 Optional Add-Ins
- Dried Fruits: Raisins, sultanas, cherries, dried blueberries or cranberries.
- Nuts: Peanuts, hazelnuts, pecans, walnuts, or pistachios.
- Other Add-Ins: Vegan marshmallows, orange zest, rum extract, or mint extract.
💬 FAQs
Store in an airtight container, or cover it with plastic wrap and keep it in the fridge for up to a week.
As it's made with a chocolate ganache base, it's important to keep the cake chilled. I would not recommend keeping it out of the fridge for more than an hour.
Yes, you can freeze it for up to 3 months. Simply wrap it in parchment paper first, and then clingfilm to ensure that nowhere is exposed to the air.
🍪 More Easy No-Bake Desserts

📖 Recipe
No Bake Chocolate Biscuit Cake (Lazy Cake)
Ingredients
Biscuit Cake
- 450 g (15.8 oz) vegan dark chocolate (70% minimum)
- 200 g (7 oz) vegan chocolate fudge sauce or vegan condensed milk
- 100 g (3.5 oz) chilled coconut cream
- 100 g (3.5 oz) vegan butter *see notes
- ½ teaspoon sea salt
- ¼ teaspoon vanilla powder or vanilla bean paste
- 300 g (10.6 oz) vegan cookies I use oreo-style, digestives, and biscoff
Chocolate Glaze (optional)
- 200 g (7 oz) chilled coconut cream
- 80 g (2.8 oz) vegan dark chocolate (70% minimum)
- 40 g (1.4 oz) vegan chocolate fudge sauce or vegan condensed milk
- 50 g (1.75 oz) vegan white chocolate
- 1 tablespoon coconut oil as needed
Instructions
Biscuit Cake
- Prepare: Line the bottom and sides of a 7.5 or 8" cake tin (with a removable base) with some parchment paper. Break up or chop the dark chocolate into small pieces. If desired, you can break the cookies into smaller pieces or simply cut them into halves/quarters.
- Melt the cake ingredients: Add the dark chocolate, fudge sauce, vegan butter, coconut whipping cream, salt, and vanilla to a large heat-resistant bowl. Place the bowl on a double boiler (Bain-marie) and slowly allow the ingredients to melt over low-medium heat. Make sure that no water can splash into the bowl at all times. Do not disturb the mixture for the first 5 minutes.Once all of the ingredients start melting, carefully begin to stir them with a rubber spatula. Continue to heat on low until you have a smooth mixture. Separate 100g of the mixture and set aside for topping the cake.
- Assemble the cake: Add 4-5 tablespoons of the chocolate filling to the base of the lined cake tin. Follow this with a layer of cookie pieces, and continue the process until you have used all of the main chocolate filling. Lastly, pour the reserved 100g of chocolate filling on top of the cake, and tap the pan on your counter to level out the ingredients and knock out any air bubbles.
- Chill: Refrigerate the cake for at least 4 hours (or overnight) until set completely.
- Demold the cake: Carefully remove the cake from the tin and remove the parchment paper from the sides. I also recommend removing the parchment from the bottom of the cake and replacing it with a new sheet. Place the cake back in the fridge while you make the glaze.
Glaze (optional)
- Make the glaze: Finely chop the dark chocolate and set it aside in a heat-resistant bowl. Add the coconut whipping cream to a saucepan and place it on medium heat until gently simmering. Pour the heated coconut cream over the chocolate and allow it to sit for 2-3 minutes uncovered, before stirring with a spatula until smooth. Stir in the chocolate fudge sauce and allow the mixture to come to room temperature for about 10-15 minutes.
- Melt the white chocolate: Add the white chocolate and coconut oil to a heat-resistant bowl and gently melt over a double-boiler. If the chocolate is too thick, add a little more coconut oil to thin it out. The goal is to have it be the same consistency as the chocolate glaze, or as close as possible.Add the melted chocolate to a piping bag and set aside until ready to use.
- Glaze the cake: Place the cake on top of an upside-down cake tin and place it into a large bowl (this is to catch the chocolate glaze that flows over). Pour the room temperature glaze over the top of the cake and allow it to run down the sides to completely cover the cake. Use a knife to carefully mark a line around the base of the cake so that you can easily remove it from the cake tin once dry.
- Spider web design: Cut the tip off of the piping bag with the white chocolate and draw a swirl on top of the cake. (This works really well if you put the cake on a turntable/lazy Susan).Take a wooden skewer or knife and move it across the lines in one direction to create a web design.Place the cake back in the fridge to set for 10-15 minutes.
- Storage: Keep refrigerated in an airtight container for up to a week. You can also freeze the cake for up to 3 months in a sealed container.
Notes
- Coconut whipping cream: Refrigerate the cans overnight, then only use the thick cream from the top of the cans.
- Feel free to add vegan marshmallows, dried fruits (raisins, cherries, or cranberries), and nuts (peanuts, hazelnuts, pecans, walnuts, and pistachios) in place of some of the vegan cookies.
© addictedtodates.com. All content and images are protected by copyright. If you want to share this recipe, please do so using the share buttons provided. Do not screenshot or republish the recipe or content in full. Instead, include a link to this post for the recipe. Thank you!