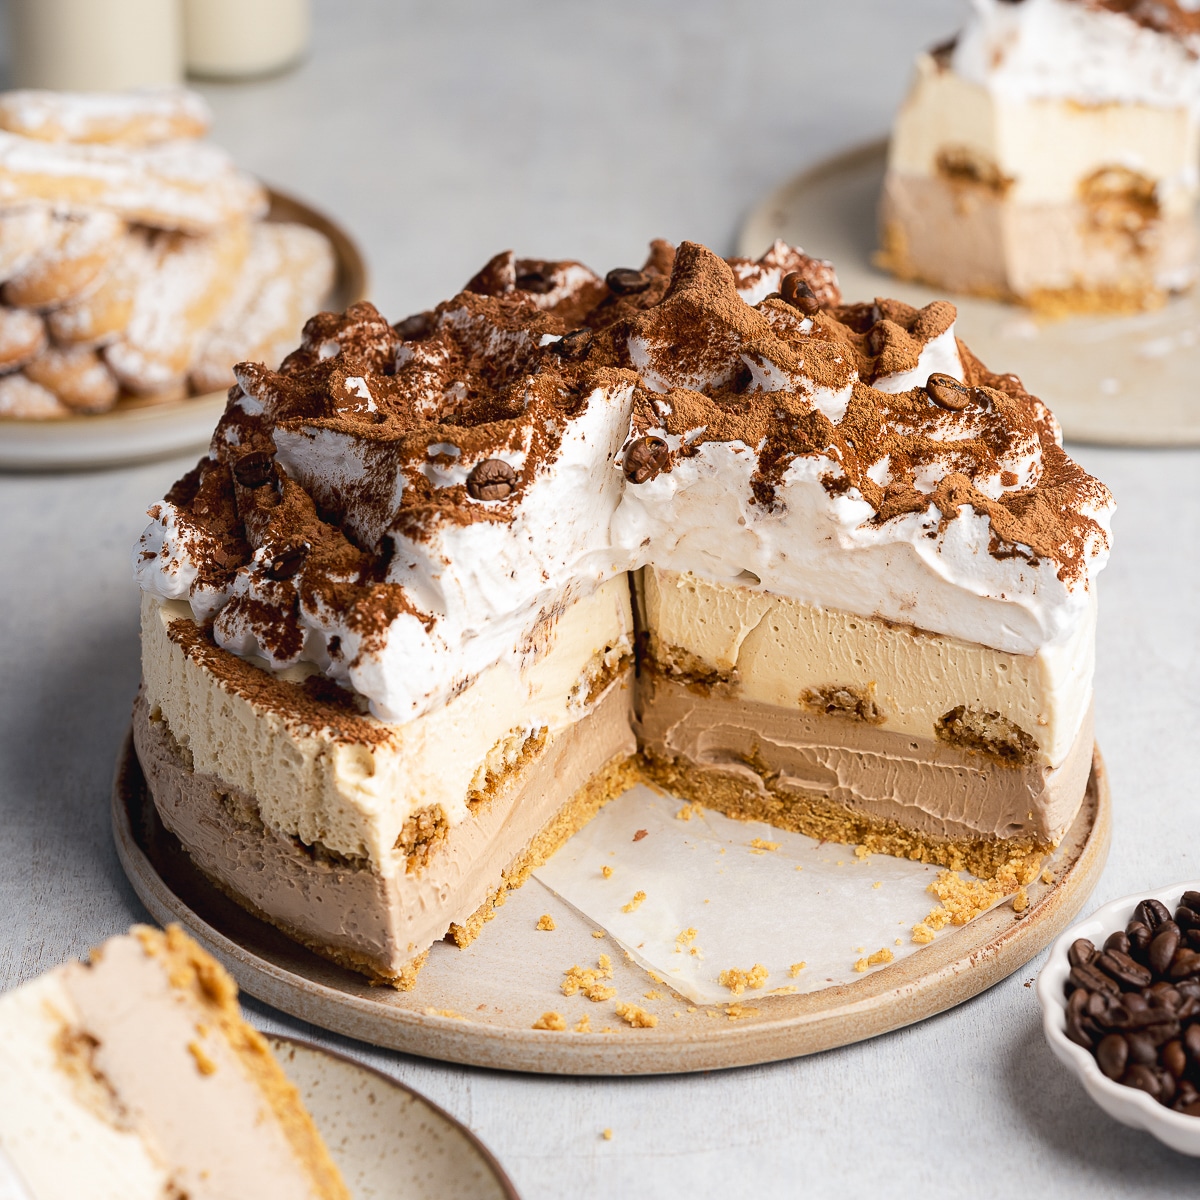
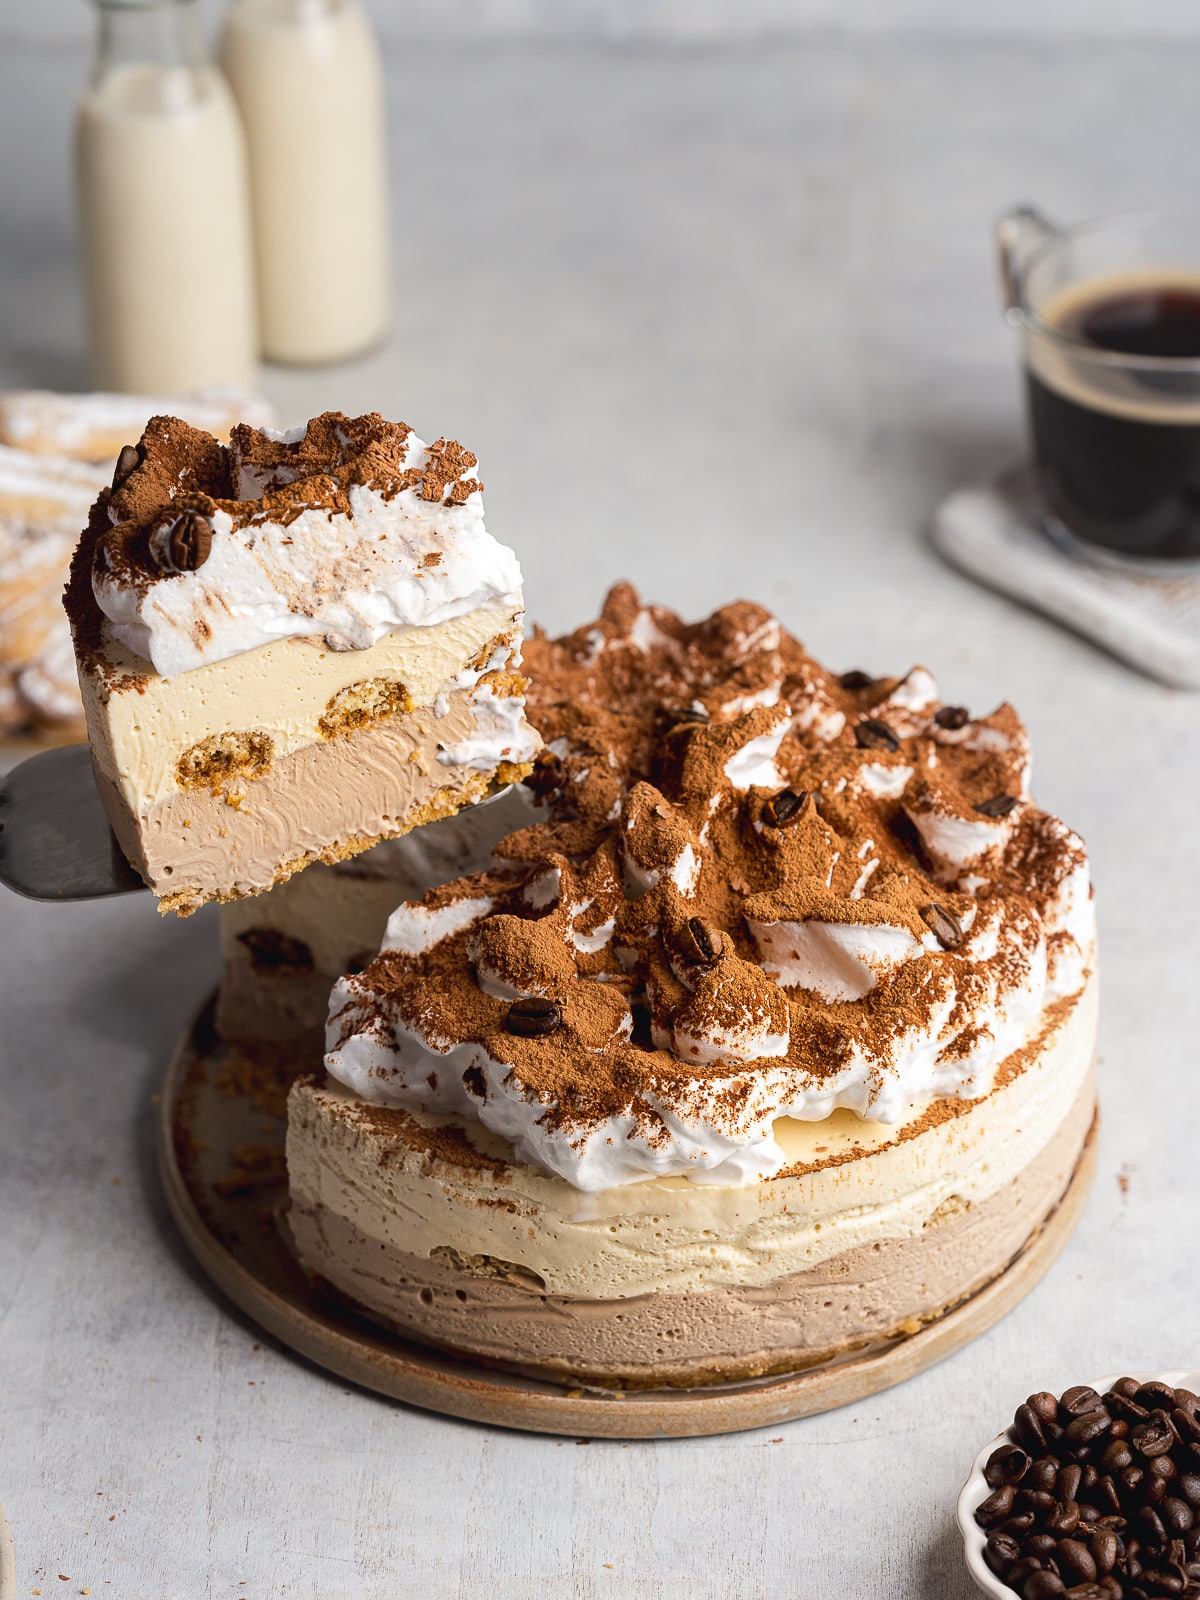
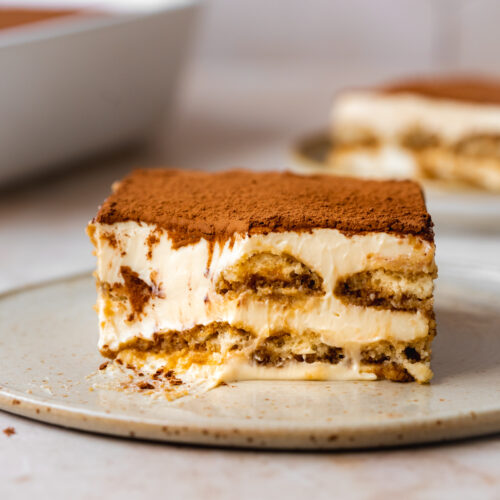
This no-bake vegan recipe for tiramisu cheesecake is a delicious mashup of my vegan tiramisu and my indulgent no-bake mocha cheesecake.
Each bite captures the essence of tiramisu with bold espresso, creamy mascarpone, homemade vegan ladyfingers, and a hint of rum. All layered into a tangy cheesecake for a true showstopper dessert.

Jump to:
🧾 Ingredients
Here's everything you need to make this tiramisu cheesecake. Find the complete list of ingredients, quantities, and instructions in the recipe card at the end of this post.
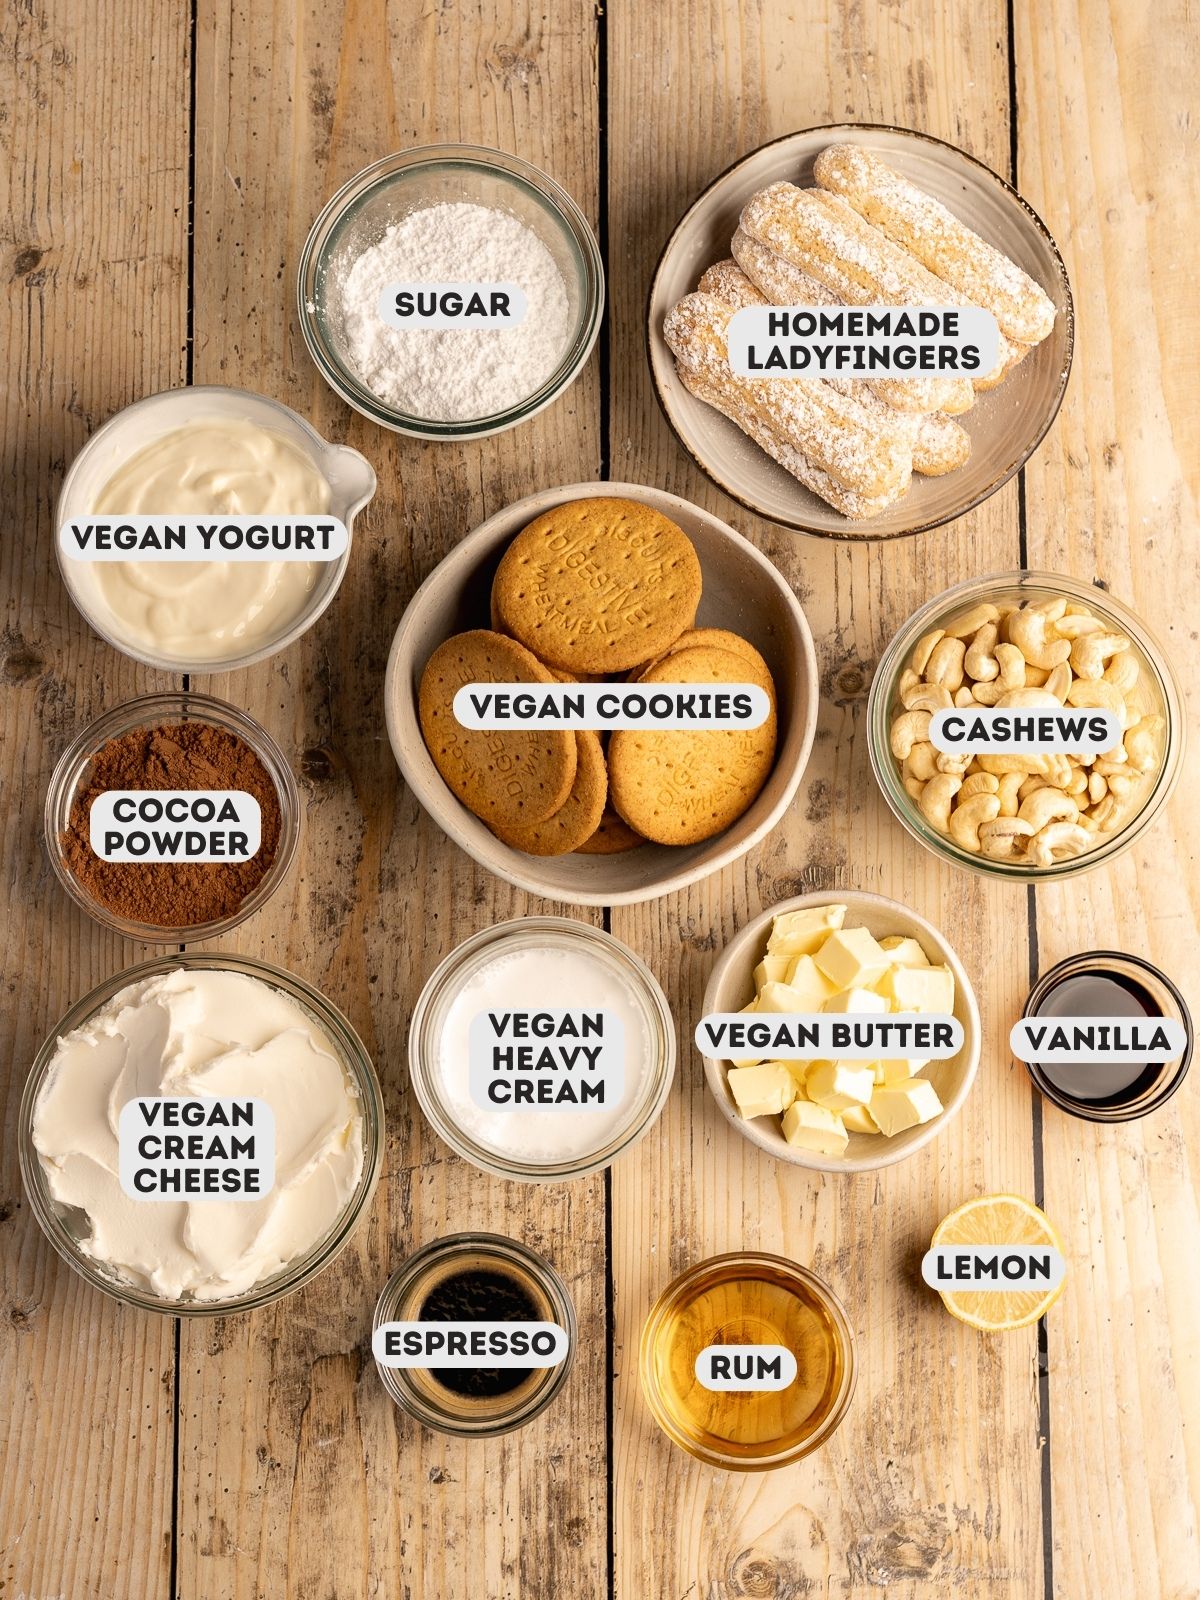
Ingredient Notes
Vegan ladyfingers: For the most classic interpretation, I suggest adding a layer of spongey vegan savoiardi between the two cheesecake layers. They're optional, so feel free to leave them out if you prefer!
Espresso: The bold coffee flavor is essential to traditional tiramisu. Use decaf if you'd like a caffeine-free option.
Rum: Adds a signature boozy warmth to the dessert. Swap it for amaretto, marsala wine, or extra espresso for an alcohol-free version.
Vegan cookies: Choose a neutral option like digestive biscuits or plain vegan graham crackers. Coffee or chocolate-flavored cookies also work if you want to amp up the flavor.
Vegan butter: Use block-style vegan butter for the best texture - avoid spreadable varieties from a tub.
Raw cashews: Be sure to use raw and unsalted cashews for the right texture and flavor. Raw macadamia nuts or sunflower seeds can work as substitutes in a pinch.
Vegan cream cheese: My homemade cream cheese is easy and budget-friendly, but a good-quality store-bought option works just as well.
Vegan Greek-style yogurt: A quick and easy option for creaminess, but for extra richness, try using my vegan mascarpone instead.
Get Your Free E-Book!
Sign up to the Addicted to Dates newsletter for your FREE Guide To Vegan Cheesecakes!
📷 Step-By-Step Images
Here's a visual overview to guide you through each step of the recipe. Please refer to the detailed card at the end of this page for full written instructions.
I suggest making the ladyfingers, and homemade vegan mascarpone (if you choose to use them) a day ahead of preparing the recipe. Here's how it's done:
Start by mixing up your espresso and rum soak - it's going to infuse that classic tiramisu flavor throughout the dessert. Set it aside so it's ready when you need it.
For the base, blitz your cookies into fine crumbs, then blend with melted vegan butter until you've got a soft dough that holds together when pressed. A flat-bottomed glass works wonders here to get a smooth, even crust.
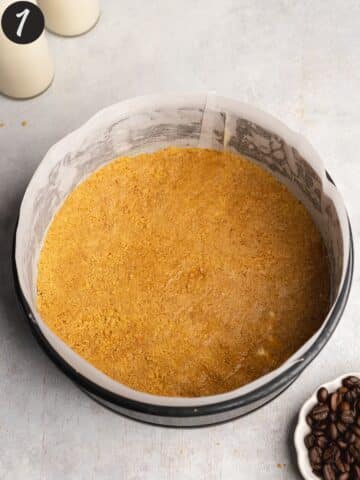
Once it's packed into the tin, give it a light brush of the espresso mixture. This adds a subtle coffee kick right from the bottom up. Pop it in the fridge to chill while you move on.
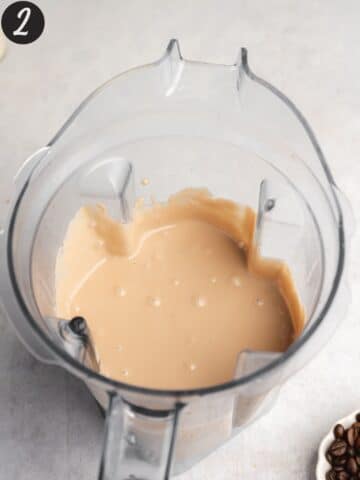
The first cheesecake layer consists of coffee cheesecake batter. Blend everything until smooth and creamy with no lumps! Then pour it over the crust and refrigerate until it firms up, about an hour.
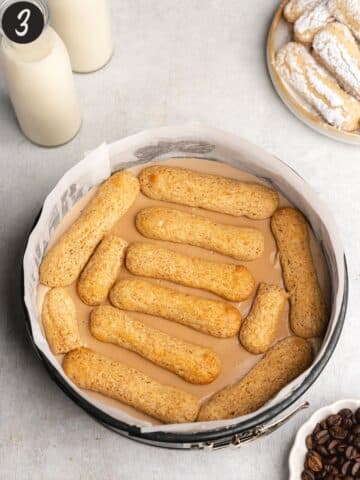
Next comes the fun part: layering the ladyfingers. Dip each one briefly in the espresso soak (just a couple of seconds per side - you want them soft but not soggy), then lay them across the set cheesecake layer. Trim them to fit snugly if needed. This layer gives that iconic tiramisu texture and flavor contrast.

Now for the final layer: the vanilla rum filling. Blend until silky smooth and pour it over the ladyfingers. This needs a longer chill (at least 5 hours, or overnight is even better) to properly set and slice cleanly.
Once it's firm, gently remove it from the tin. Peel off the parchment and tidy up the edges with a knife or cake scraper if needed. Keep it chilled until you're ready to decorate.
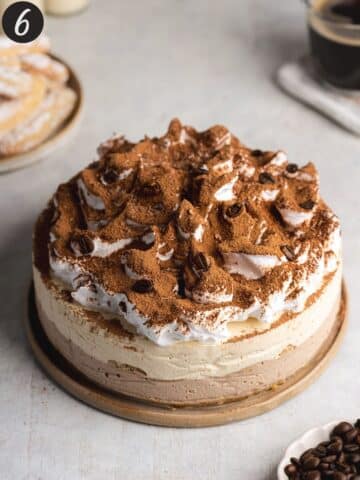
Just before serving, add whipped vegan cream and a dusting of cocoa powder on top of the cheesecake for that classic tiramisu finish.

🍰 Variations
- Tiramisu bars: Go rectangular and make your no-egg tiramisu cheesecake in a 9x13.
- Gluten-free option: Feel free to use the gluten-free cookies or biscuits of choice for a celiac-friendly crust, then omit the ladyfingers!
- Mini cheesecake bites: Skip the slicing and assemble your vegan tiramisu cake in a mini cheesecake tin. The little bites are perfectly portioned for any dessert table!
📝 Recipe Tips
Springform pan: Use a springform pan for easy removal and clean edges. Line both the base and sides with parchment paper for the best results.
Chill time: Let the cheesecake set in the fridge for at least several hours, preferably overnight. This ensures a firm yet creamy texture.
Presentation: Garnish with a dusting of cocoa powder, dark chocolate shavings, or coffee beans for a classic, elegant finish.
Temperature control: Serve chilled, but let it sit at room temperature for a few minutes before slicing to enhance the flavors and texture.
💬 FAQs
You can make tiramisu cheesecake 2 to 3 days ahead of serving, which is perfect for prepping in advance. Keep it well covered in the fridge to maintain freshness and prevent it from absorbing odors. For best results, add garnishes like cocoa powder or vegan whipped cream just before serving.
Absolutely! If you need to prepare your cheesecake more than 3 days in advance, consider freezing it. This recipe for tiramisu cheesecake can typically be frozen for up to a month. Wrap the cheesecake tightly in plastic wrap and then in foil before putting it in the freezer. Thaw it overnight in the refrigerator before garnishing it with whipped cream and cocoa powder, then serve.
☕ More Vegan Coffee Desserts
📖 Recipe
Vegan Tiramisu Cheesecake
Ingredients
- ⅓ batch vegan ladyfingers about 10 cookies
Espresso Soak
- 100 ml (⅖ cup) espresso or strong coffee
- 30 ml (2 tbsp) rum or amaretto, marsala, or additional espresso
Crust
- 200 g (7 oz) vegan cookies digestives or vegan graham crackers
- 90 g (6 ½ tbsp) vegan butter (block-style)
Coffee Cocoa Filling
- 200 g (1 ½ cups) cashews soaked *note 1
- 300 g (10.58 oz /1 ⅓ cups) vegan cream cheese
- 120 g (1 cup) vegan Greek-style yogurt or vegan mascarpone
- 80 g (⅔ cup) powdered sugar
- 60 g (7 ½ tbsp) vegan butter, block-style or coconut oil or cacao butter
- 2 teaspoons lemon juice freshly squeezed
- 30 ml (2 tbsp) espresso or strong coffee
- 1 tablespoon cocoa powder *note 2
Vanilla Rum Filling
- 200 g (1 ½ cups) cashews soaked *note 1
- 300 g (10.58 oz /1 ⅓ cups) vegan cream cheese
- 120 g (1 cup) vegan Greek-style yogurt or vegan mascarpone
- 80 g (⅔ cup) powdered sugar
- 60 g (7 ½ tbsp) vegan butter, block-style or coconut oil or cacao butter
- 2 teaspoons lemon juice
- 1 tablespoon rum or amaretto, marsala, or additional espresso
- 2 teaspoons vanilla extract *note 3
Topping
- 200 ml (¾ cup + 1 tbsp) vegan heavy whipping cream or coconut cream
- 20 g (4 tbsp) cocoa powder
Instructions
- Preparation: Make the ladyfingers (and mascarpone if using) up to 1-2 days in advance as desired. Soak the cashews (see note 1). Line the base and sides of an 8" or deep 7" cake tin (with a removable base) with parchment paper. Make sure the parchment rises an inch or so above the sides of the pan (see step-by-step image 1 in the blog post for reference).
- Espresso Soak: Mix the espresso and rum in a small bowl, and set aside.
- Crust: Add the cookies to your food processor and blitz for a minute until it reaches a fine crumb consistency. Add the butter and blend again until the ingredients stick together to form a soft dough consistency.
- Press the mixture into the base of the pan, using a spatula or flat-bottomed glass to smooth it out. Using a pastry brush, lightly brush the crust with some of the espresso soak. Set aside in the fridge.
- Coffee Cocoa Filling: Add all of the filling ingredients to a high-speed blender and blitz until smooth and creamy without any lumps. Pour the mixture into the cake pan and refrigerate for 1 hour until firm.
- Individually dip each ladyfinger in the rum espresso soak for 2-3 seconds on each side and arrange them on top of the coffee cheesecake layer (cut the cookies to size if needed - see step-by-step image 3 in the blog post for reference).
- Vanilla Rum Filling: Add all of the filling ingredients to a high-speed blender and blitz until smooth and creamy without any lumps. Pour the mixture into the cake pan and refrigerate for a minimum of 5 hours (or overnight) until set
- Once set, remove the cheesecake from the cake tin and carefully peel away the parchment from the sides of the cake. If needed, carefully run a knife or cake scraper around the edges to smooth it out. Refrigerate the cake until ready to decorate.
- Topping: Top the cheesecake with whipped heavy cream and dust with cocoa powder before serving.
- Storage: Store in an airtight container and refrigerate for up to 4-5 days. Alternatively, you can freeze in an airtight container for up to a month. You can also freeze any leftover portions that you don't want to serve right away. To defrost, place them on a plate in the fridge overnight.
Notes
- Soaked cashews: Soak the cashews in water for 4 hours, rinse, and drain.
- Cocoa powder: I suggest using Dutch-processed cocoa powder for a more intense chocolate flavor without the bitterness of conventional cocoa.
- Vanilla extract: You can also use an equal amount of vanilla paste.
- Vegan heavy cream: You need double cream, such as dairy-free Schlagfix or Emlea, which are designed for whipping. Alternatively, use full-fat coconut milk or coconut whipping cream.
© addictedtodates.com. All content and images are protected by copyright. If you want to share this recipe, please do so using the share buttons provided. Do not screenshot or republish the recipe or content in full. Instead, include a link to this post for the recipe. Thank you!
This recipe was originally posted in September 2021. It has since been modified and improved to simplify ingredients and instructions